 and settings GA4 tracking")
CookieBot settings, deployment/implementation via GTM (Google Tag Manager) and settings GA4 tracking
If your website uses Google Tag Manager (GTM), deploying Cookiebot can be done easily by following these step-by-step instructions. This guide will walk you through how to implement the cookie consent banner, control cookie-setting tags, and display the cookie declaration on a subpage.
Before following the instructions, make sure that you have already created a GTM account, set up a website container in GTM, and added the GTM container snippet to your website as required. For more information, visit: https://support.google.com/tagmanager/answer/6103696
Implementing the cookie consent banner in GTM
First, obtain the Cookiebot CMP tag template from the Template Gallery. The easiest way to do this is by clicking the Get Started button on the Consent Overview
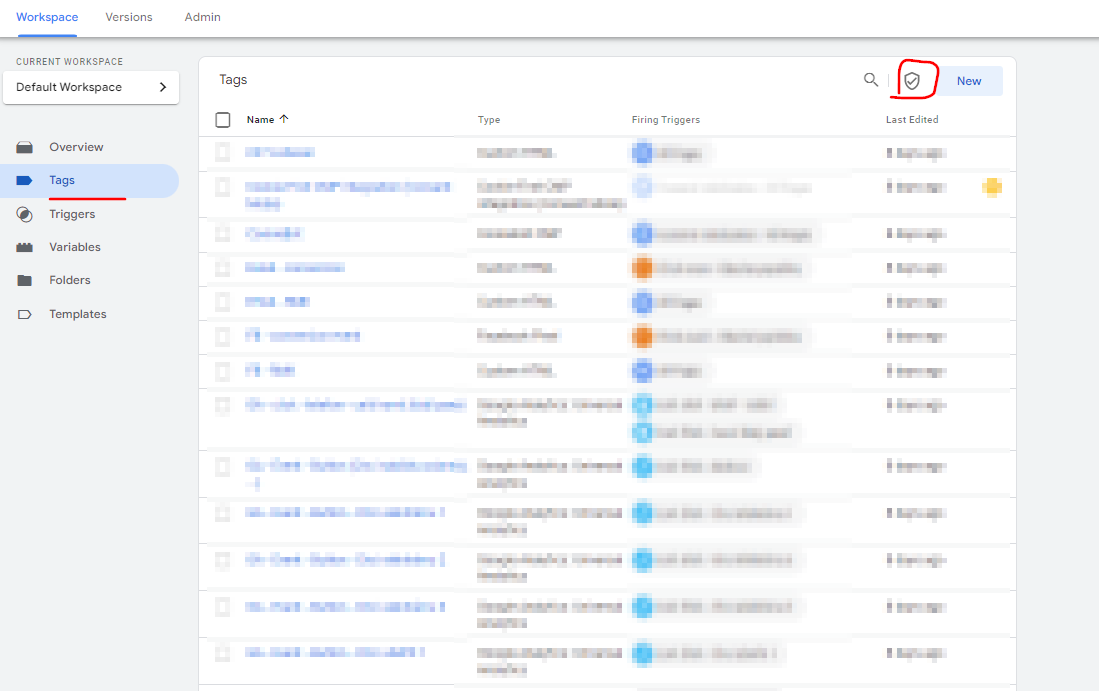
You can find the Consent Overview by clicking on the icon ![]() on the Tags section.
on the Tags section.
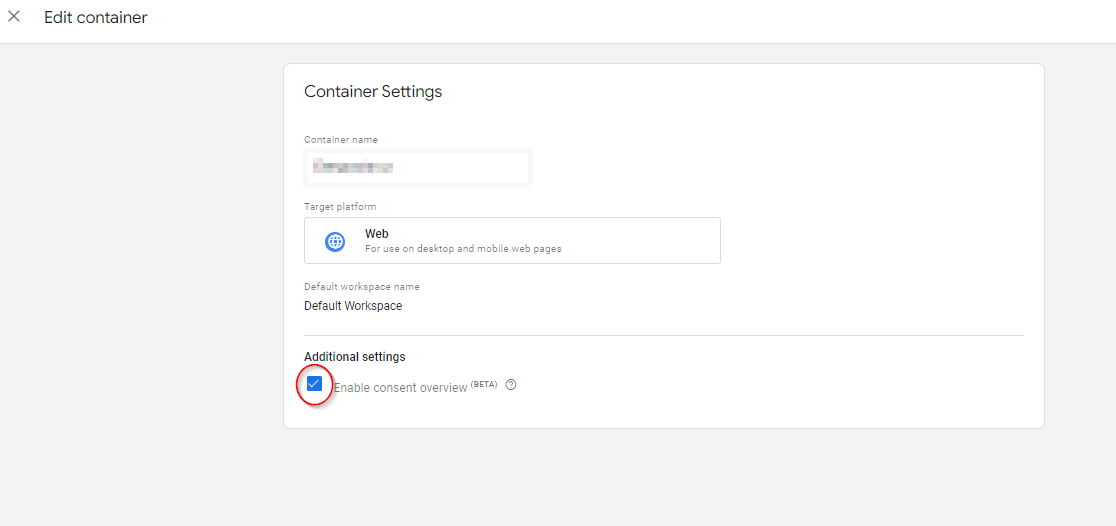
If you don’t see this icon, you can enable this function on the Admin tab, under Container Settings.
Check the “Enable consent overview” box under Additonal Settings and save your changes:
When you click the Get Started button, a pane will slide in from the right where the Cookiebot CMP template should be one of the featured CMP templates.
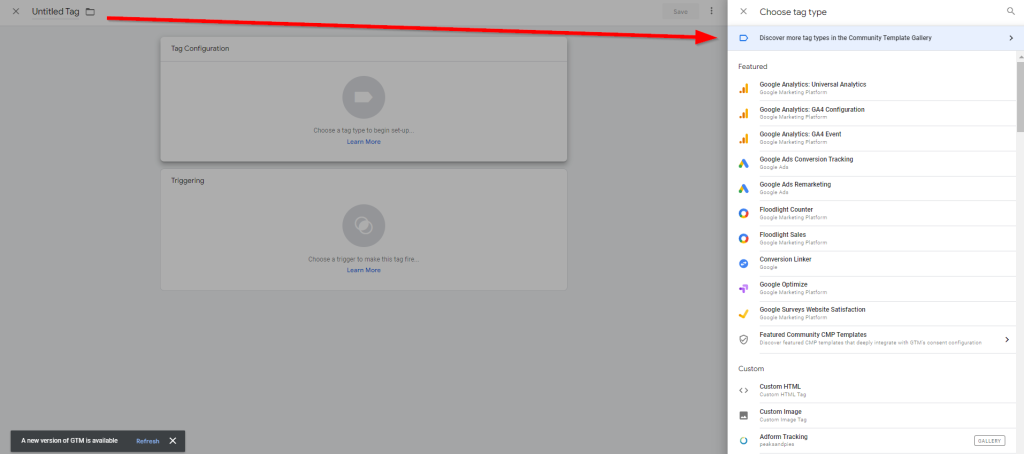

Alternatively, add a new tag and click the “Discover more tag types in the Community Template Gallery” item
Enter “Cookiebot” in the search field to find the Cookiebot CMPtag template
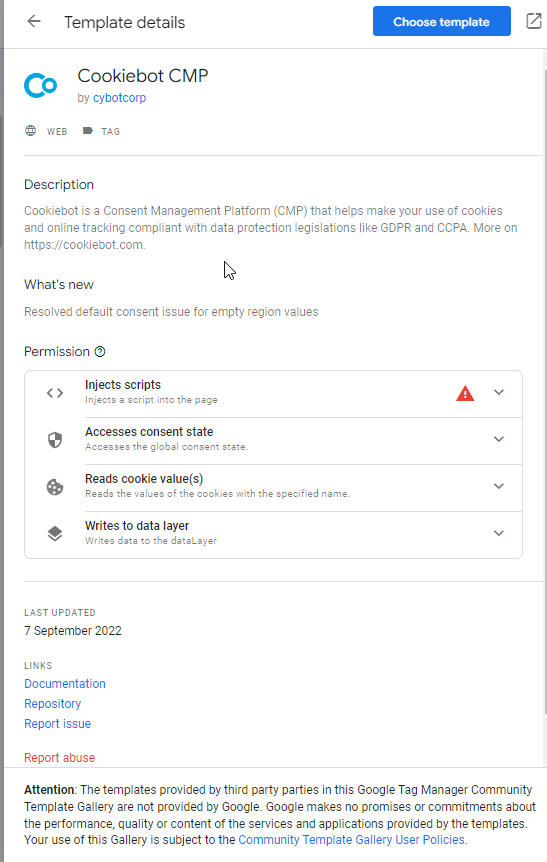
Select the “Cookiebot CMP” item and click the “Add to workspace” button.
Confirm by clicking “Add”
Next, create a new tag by clicking “New” ❯ “Tag Configuration” and select “Cookiebot CMP” from the list of standard tag types.
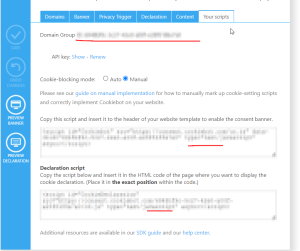
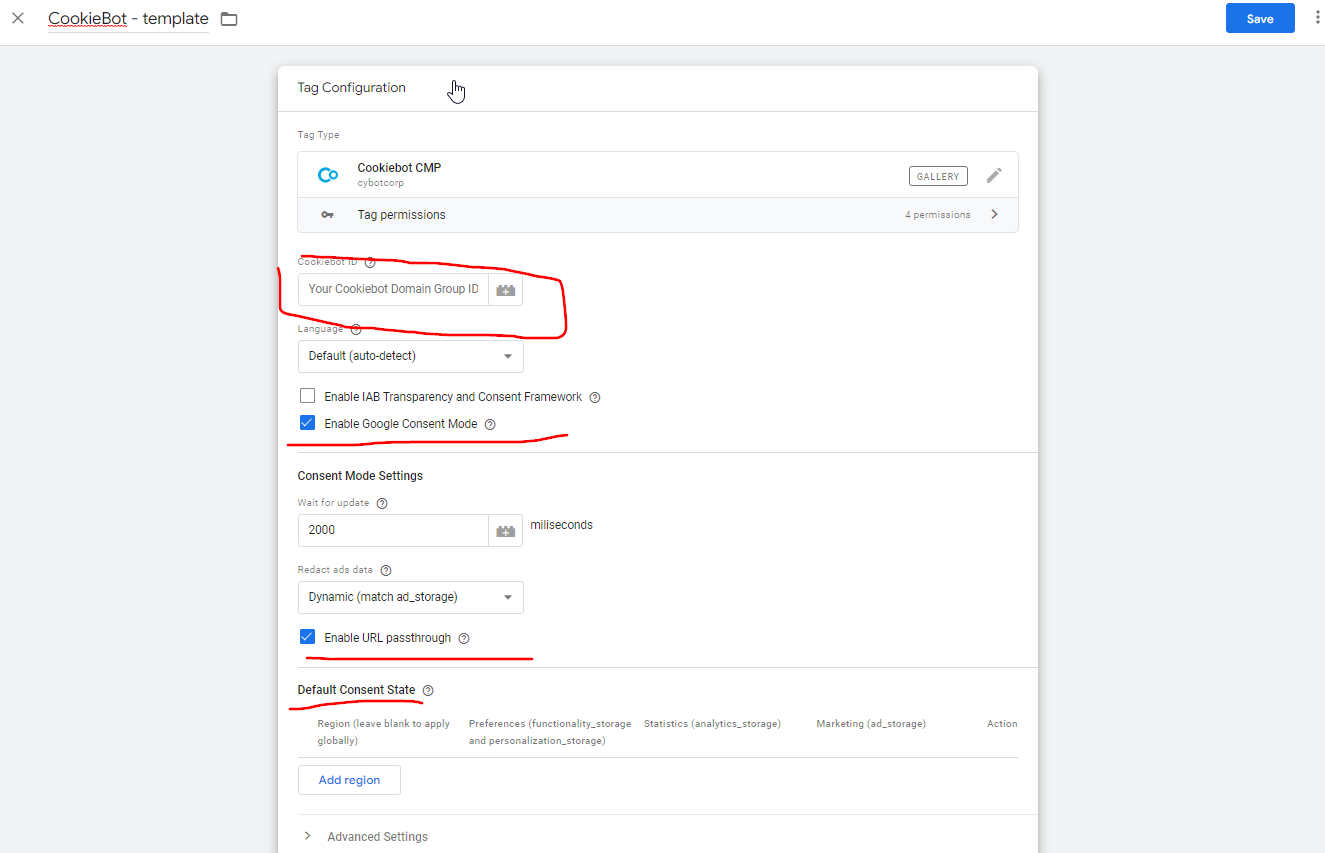
In the “Cookiebot ID” field, copy in the ID from the ‘Your Scripts’ tab under your account on https://manage.cookiebot.com/en/manage (in Your scripts) or you can copy Domain Group ID.
Choose “Consent initialization – All pages” as trigger and apply a name to your tag at the top of the configuration page, e.g. “Cookiebot”. Click “Save” to create the tag.
This is what your tag configuration should look like (except for the value of the Cookiebot ID):
Make sure that you have registered and saved the domain name(s) of your website(s) in Cookiebot.
Enabling URL passthrough in Google Tag Manager (GTM) allows Cookiebot to scan your website’s subpages for cookies and scripts that need to be blocked or audited. By default, Cookiebot scans only the homepage of your website, but enabling URL passthrough extends its scanning capabilities to other pages on your website.
When URL passthrough is enabled in GTM, Cookiebot can check each page on your website for cookies and scripts that need to be blocked, and it can also display the cookie declaration on each subpage. This ensures that your website is fully compliant with relevant privacy regulations, such as the General Data Protection Regulation (GDPR) in the European Union.
Enabling URL passthrough in GTM is a straightforward process that involves creating a new trigger in GTM and configuring it to pass URLs to Cookiebot. By following the step-by-step instructions provided by Cookiebot, you can easily enable URL passthrough in GTM and ensure that your website is fully compliant with privacy regulations.
Defining the Google Consent Mode default consent state
The Default Consent State for the Cookiebot Gallery Template in GTM refers to the initial state of the cookie consent banner when a user visits a website. This setting allows website owners to control the default consent state of their visitors, either giving or denying consent to the use of cookies.
The Cookiebot Gallery Template is a pre-designed cookie consent banner that can be installed on a website through Google Tag Manager (GTM). The default consent state setting in GTM allows website owners to choose whether the cookie consent banner will appear in an “Accepted” or “Declined” state when a user first visits the website.
This setting can be useful for website owners who want to give their visitors more control over their cookie preferences, or who want to ensure that visitors are aware of their website’s use of cookies before giving their consent. By setting the default consent state, website owners can also ensure compliance with data protection regulations, such as GDPR and CCPA.
GTM by default supports 5 different consent types that are automatically mapped by Cookiebot to the 4 categories used in Cookiebot CMP:
| GTM Consent Type | Mapped Cookiebot Type | Description |
| ad_storage | marketing | Enables storage (such as cookies) related to advertising |
| analytics_storage | statistics | Enables storage (such as cookies) related to analytics e.g. visit duration |
| functionality_storage | preferences | Enables storage that supports the functionality of the website or app e.g. language settings |
| personalization_storage | preferences | Enables storage related to personalization e.g. video recommendations |
| security_storage | necessary | Enables storage related to security such as authentication functionality, fraud prevention, and other user protection. Users will be informed about the specific storage purposes in the cookie declaration, but this type does not require consent from the end user. |
Note! The three new consent types are only for non-Google tags. Google tags (e.g. Analytics, Ads, and Floodlight) are only sensitive to ad_storage and analytics_storage.
It’s somewhat odd seeing functionality_storage and security_storage here, as at least in the European Union they are typically deemed to be strictly necessary storage and thus wouldn’t require consent at all. On the other hand, having more configuration options is rarely a bad thing.
You can actually add any consent types you like into the respective API calls and tag settings. The three new consent types are Google’s recommendations, but they’re not an exhaustive list.
Defining the Google Consent Mode in CookieBot template from GTM gallery
GTM by default supports 5 different consent types that are automatically mapped by Cookiebot to the 4 categories used in Cookiebot CMP:
| GTM Consent type | Cookiebot type | Description |
| ad_storage | marketing | Enables browser storage (such as cookies) related to advertising |
| analytics_storage | statistics | Enables browser storage (such as cookies) related to analytics e.g. visit duration |
| functionality_storage | preferences | Enables browser storage that supports the functionality of the website or app e.g. language settings |
| personalization_storage | preferences | Enables browser storage related to personalization e.g. video recommendations |
| security_storage | necessary | Enables browser storage related to security such as authentication functionality, fraud prevention, and other user protection. Users will be informed about the specific storage purposes in the cookie declaration, but this type does not require consent from the end user. |
The category ‘necessary’ (mapped to consent type security_storage) is by default set to ‘Allow’ and is not configurable, as it does not require consent.
A default consent state of ‘denied’ will apply until the user has submitted consent. You can change this default behavior and add different default consent states for users in different geographical regions by clicking “Add region” under the “Default Consent State” section.
In the example above, a global (blank region value) default consent state of ‘denied’ is defined for all users along with a specific ‘granted’-state for users from California (US-CA).
Please use ISO-3166-1 alpha-2 country codes for region values. For the United States, it is also possible to use state-specific regions, e.g. “US-CA” for California. If a specific default consent state applies to multiple regions, you can add a comma-separated string of regions to the Region field.
Controlling cookies
Google Tag Manager includes several features that work together with Cookiebot to help you manage how tags behave in response to the end user’s consent choices.
Specific tags (such as Google Ads, Analytics, Floodlight, and Conversion Linker) have built-in consent checks. This means that these tags include logic that automatically changes the tag’s behavior based on the user’s consent state. No consent configuration is needed for this type of tag*.
Tags that do not have built-in consent checks, which do utilize tracking, must be configured with additional consent checks. Opposed to tags with built-in consent checks, which load regardless of consent, tags configured with additional consent checks will not fire unless consent has been given for the corresponding storage category.
In the next section, we will provide instructions to configure additional consent checks.
It is important to note that because tags with built-in load regardless of consent, data will be transmitted to Google without explicit permission from the visitor. If this is of concern to you, it is recommended to configure tags with built-in consent with additional consent as well. That way the tag will not load prior consent.
CookieBot banner settings in the admin interface
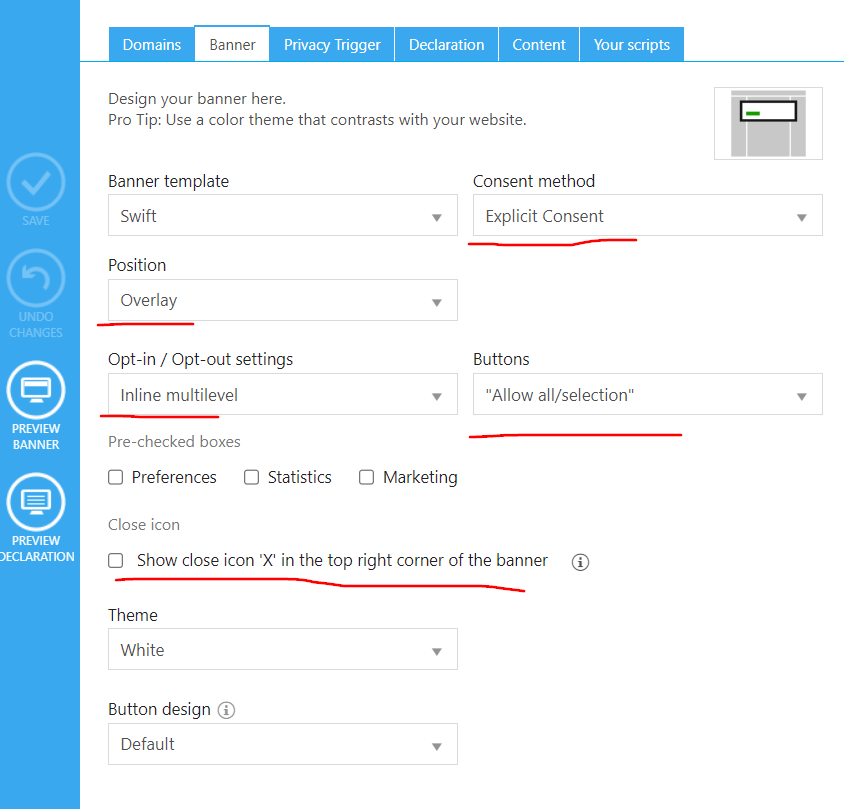
For EU use Explicit Consent in the tab Banner.
Explicit consent and implicit consent refer to the two different methods of obtaining user consent for the use of cookies on a website, as required by data protection regulations such as GDPR.
Explicit consent means that the user is presented with a clear and specific request for their consent before any cookies are stored on their device. The user must actively indicate their consent by clicking an “accept” button or similar. This method ensures that the user is fully aware of what they are consenting to and gives them the opportunity to opt-out.
Implicit consent, on the other hand, is assumed consent based on the user’s behavior or settings. For example, if a user continues to use a website after being presented with a cookie banner that explains the use of cookies, it may be assumed that they have given their consent. Similarly, if a user’s browser settings allow cookies, it may be assumed that they have given their consent.
However, under GDPR and other data protection regulations, explicit consent is generally required for non-essential cookies. Implicit consent may be sufficient for essential cookies that are necessary for the functioning of the website. Cookiebot is a tool that can help website owners obtain and manage explicit consent for cookies.
Use position “Overlay” (banner displayed in the center and background is overlayed by filter) and uncheck “Show close icon ‘X’ in the top right corner of the banner” (as then each click outside the area = no cookie consent was given, so you maximize the number of cookies you collect).
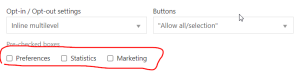
Inline multilevel – Users can opt-in and out of separate cookie categories inside the details banner.
You can also include your logo and set if the cookie banner should be displayed to each visitor or to just EU visitors (where GDPR law is applicable).
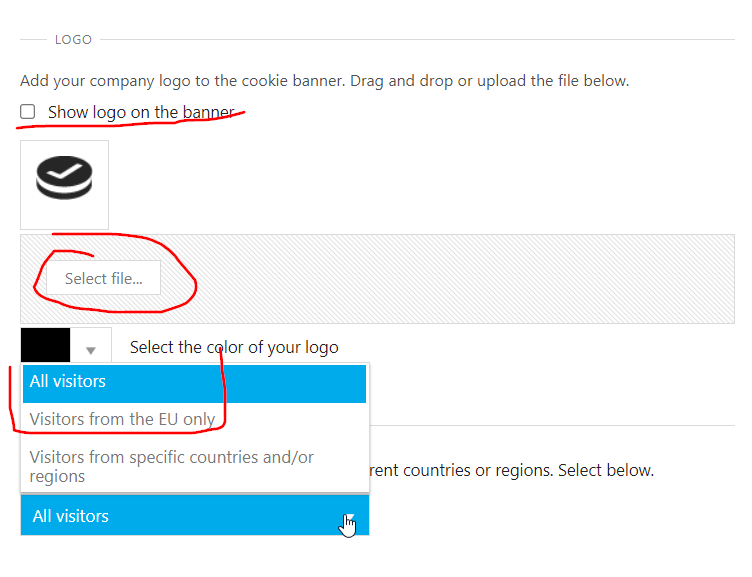
You can also use your own design (which means coding the whole banner itself).
Setting up Additional Consent Checks
- In your GTM container, create the following trigger, to be used in your GTM configuration:
Event Name: cookie_consent_update
Event Type: Custom Event
Fires On: All Custom EventsYour trigger should look similar to this: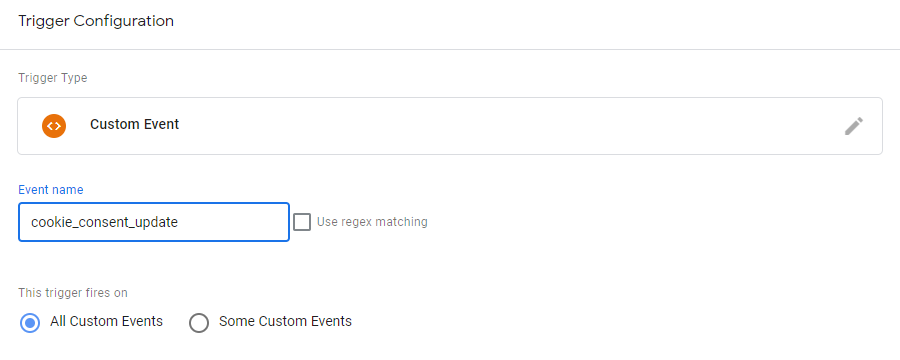
- Edit the consent settings for all tags that need to be configured with additional consent.
You can find these settings in the Tag Editor ❯ Advanced Settings ❯ Consent Settings.
Add all storage categories which the tag requires (see the scan report from Cookiebot if you are in doubt).In this example the tag requires consent for ad_storage / marketing cookies: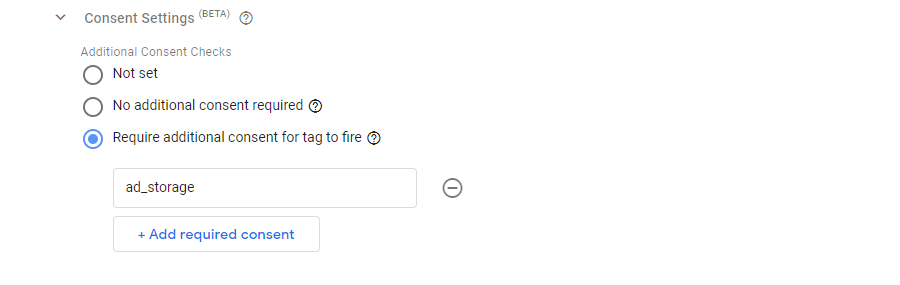
- In order to make sure that the tag is triggered once the consent choices have been established, whether from a previous visit or interaction with the banner, you will need to replace the “All Pages” trigger with the trigger created in the first step.Here’s an example using a Facebook Pixel tag, which will only fire if the visitor has opted in to the necessary consent type with this setup:
 For a complete view of the consent settings across all the tags in your container, you can enable the Consent Overview from your container settings:
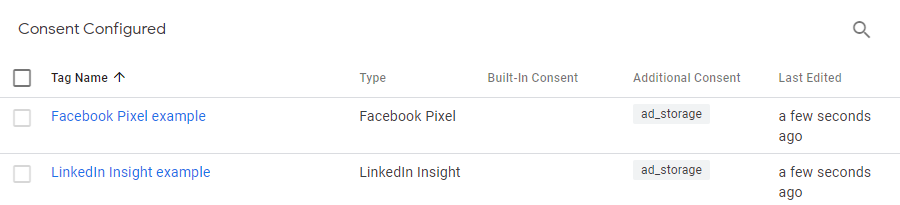 There are additional methods, besides using Consent Mode, to ensure tags cannot load prior consent. Please see Alternative methods for conditionally loading tags for instructions.
For that settings, I just recommend to setup variables for each consent and setting up the default value as false in GTM or making sure in CookieBot you uncheck the option. First setup in GTM will make sure that the default value for specific consent to false (for ad/marketing cookies for example).
That can be used as secondary option for situation that someone forgot to uncheck it in CookieBot.
Implementing the cookie declaration
To provide users with the ability to modify or revoke their consent, you can integrate Cookiebot’s “Cookie Declaration” on a preferred webpage by inserting the following script tag directly into the page’s source code and determining the location on the page where the cookie declaration will be shown (substitute “00000000-0000-0000-0000-000000000000” with your unique Cookiebot ID):
<script
  id="CookieDeclaration"
  src="https://consent.cookiebot.com/00000000-0000-0000-0000-000000000000/cd.js"
  type="text/javascript"
></script>
Make sure to link to the page that embeds the declaration from all pages on your website, e.g. in the website template footer.
Marking up your non-GTM website elements
Once your Google Tag Manager (GTM) setup is complete, the next step is to markup the non-GTM elements of your website. By implementing Cookiebot via GTM, you can use Cookiebot to manage tags that require consent but do not originate from GTM, such as scripts, images, and iframes that are directly inserted into your website template.
Such tags need to be marked up for ‘prior consent’ as described in our manual mark up guide. If you wish to combine the use of Google Tag Manager and automatic blocking, please see Google Tag Manager and Automatic cookie blocking.
This is used mainly for hard-coded implementations. This means for scripts outside the GTM.
You will use special part of the script (depending on how you want to make sure CookieBot will work with that consent).
data-cookieconsent=”marketing”
data-cookieconsent=”statistics”
data-cookieconsent=”preferences”
data-cookieconsent=”ignore”
“Ignore” only affects automatic blocking and is not relevant in this context. For more details, see this article.
“necessary” or “unclassified” are not valid values and should never be used. Instead necessary scripts should simply not be marked up.
In case you use for all scripts GTM only – you first need to add this piece of code in the GTM script to make sure the GTM is not waiting for any cookie consent and then in GTM there must be set all rules based on cookie consent from the actual user.
<script data-cookieconsent=”ignore”>(function(w,d,s,l,i){w[l]=w[l]||[];w[l].push({‘gtm.start’: new Date().getTime(),event:’gtm.js’});var f=d.getElementsByTagName(s)[0], j=d.createElement(s),dl=l!=’dataLayer’?’&l=’+l:”;j.async=true;j.src= ‘https://www.googletagmanager.com/gtm.js?id=’+i+dl;f.parentNode.insertBefore(j,f); })(window,document,’script’,’dataLayer’,’yourID‘);</script> <!– End Google Tag Manager –>
Settings GA UA (Google Universal Analytics) or GA4 (Google Analytics 4)
Create GA4 ID variable (Variables – Create New – Constant – insert GA4 ID)
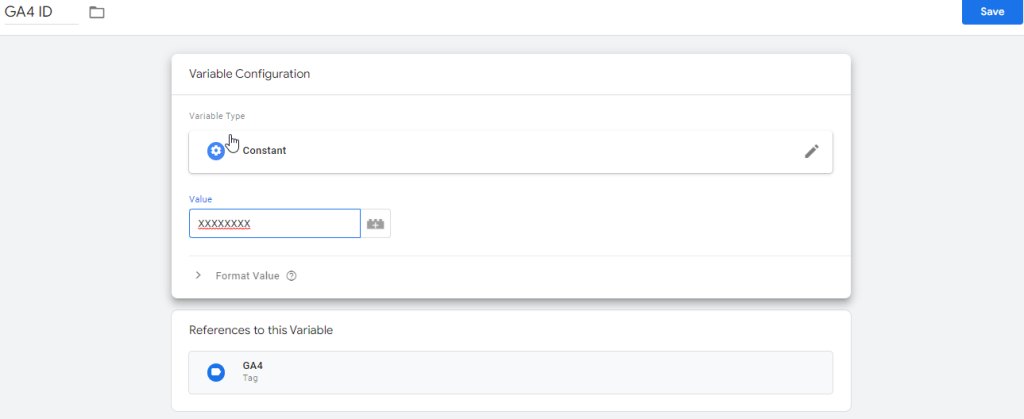
GA4 tracking ID – you will find it in your GA4 property
![]()
Then you setup trigger all pages and just check you include there ad_storage

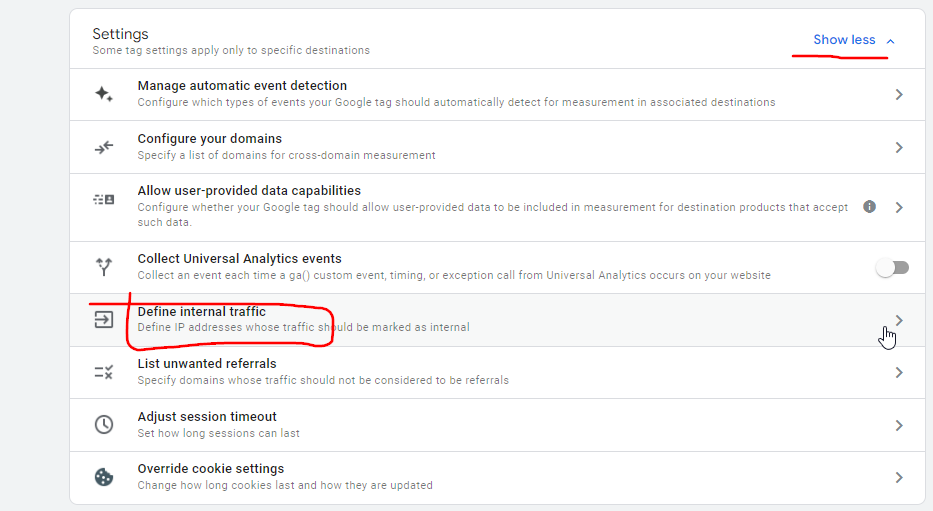
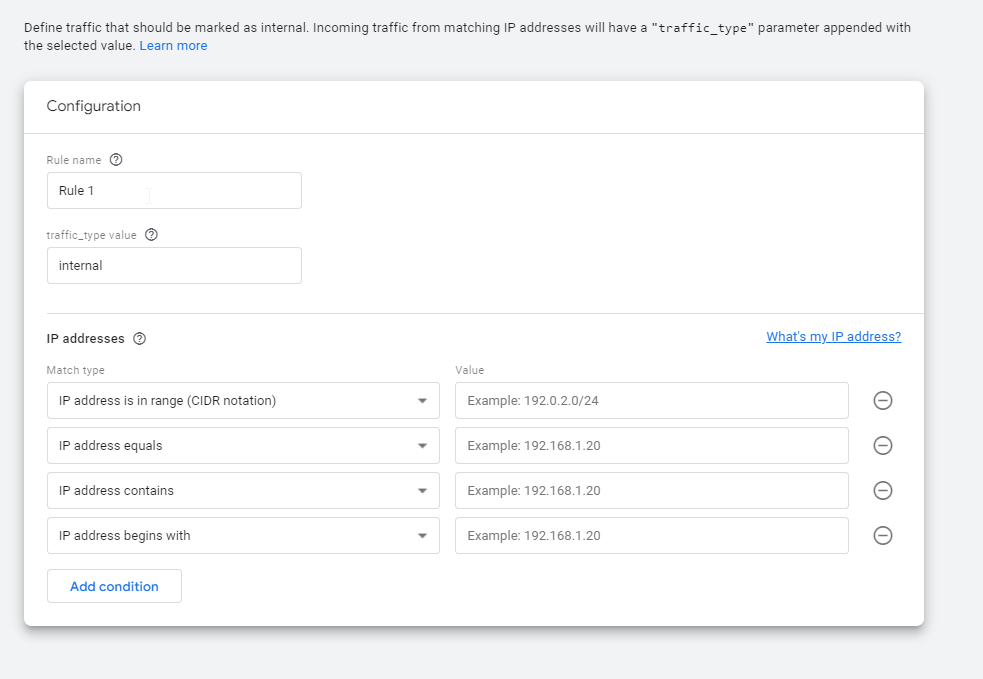
Internal filters in GA4
Under Configure tag settings you can also setup internal filters (max. 10 profiles with maximum 10 items in it – so you are quite limited).
You can use these options:
- IP xxx.xxx.xxx.xxx = IP address equals
You go to myip.com and just copy it - IP format: xx.xxx.xx.x/xx (range) = IP address is in range (CIDR notation)
Like 10.222.333.10/20 will filter out all 10.222.333.10 up to 10.222.333.20 (also 10.222.333.11, 10.222.333.12 etc.) - IP format: xxx.xxx.xxx = IP address begins with (you can use that to have fewer filters)
Additional resources
For instructions on how to make the cookie banner change language depending on which (language) part of your website a visitor navigates, please see Multilingual support when using GTM.
Consent Mode is enabled by default. If you for any reason want to disable Consent Mode, please untick the checkbox “Enable Google Consent Mode”.
See also blog post: Google tag manager and GDPR
Was this article helpful?
Support us to keep up the good work and to provide you even better content. Your donations will be used to help students get access to quality content for free and pay our contributors’ salaries, who work hard to create this website content! Thank you for all your support!
Reaction to comment: Cancel reply