
Quick tip: How you can read data and extract text content from PDF/images without manual rewriting for free
There are several free tools that can read data from PDFs and images and extract the text, which can then be edited or copied to another document. Here are some popular options:
- Google Drive: Google Drive offers a free OCR (Optical Character Recognition) feature that can extract text from PDFs and images.
- Microsoft OneNote: Microsoft OneNote has a built-in OCR feature that can extract text from images and PDFs.
- Adobe Acrobat Reader DC: Adobe Acrobat Reader DC has an OCR feature that can extract text from scanned PDFs.
- ABBYY FineReader Online: ABBYY FineReader Online is a free OCR tool that can extract text from PDFs and images.
- Tesseract OCR: Tesseract OCR is a free and open-source OCR engine that can be used to extract text from images.
It’s important to note that the accuracy of OCR tools can vary depending on the quality of the original document, so it’s always a good idea to double-check the extracted text for accuracy.
What is OCR and how to use OCR documents for free in Google Drive for extracting text from images
Optical character recognition (OCR) is the process used to convert an image containing text into a text format that can be read by a machine. OCR is considered one of the most significant advancements in document technology.
In today’s world, where individuals are striving to go paperless and become more organized to support the environment, knowing how to utilize OCR is crucial. The best part is that you can take advantage of this technology without spending a dime by using Google Drive’s built-in OCR tool.
How does OCR work?
Optical character recognition (OCR) is a process that converts the physical form of a document into a machine-readable text format. In this process, a scanner is used to copy all pages of the document, which is then turned into a two-color or black-and-white version using OCR software. Characters in the dark regions of the scanned image are identified, while the light areas are classified as background.
OCR technology recognizes alphabetical or numerical digits from the scanned image using either feature recognition or pattern recognition algorithms.
The main benefits of OCR technology include:
- Cost-cutting
- Workflow acceleration
- Content processing and document routing automation
- Data centralization and security
Ensure staff members have access to the most recent and correct information to improve service. The program’s three primary core approaches are as follows:
Image pre-processing
The initial step in optical character recognition (OCR) is to convert the physical form of a document into an image, similar to a scanned image. The goal of this stage is to ensure the accuracy of the machine’s representation while removing any unwanted variations. The image is then converted into black and white and analyzed to distinguish bright and dark regions (characters). OCR technology is then used to separate the image into distinct components, such as text, spreadsheets, or inset graphics.
AI character recognition of pre-processed images
AI character recognition is then used to analyze the dark regions of the image to identify characters and numbers. AI typically targets one letter, word, or paragraph at a time using one of two strategies: pattern recognition or feature recognition.
Pattern recognition of pre-processed images
Pattern recognition involves training the AI system using various languages, text types, and handwriting to identify matches. The algorithm compares the detected letters in the image to the notes it has already learned. In contrast, feature recognition applies rules based on specific character traits to recognize new characters. The quantity of curving, intersecting, or angled lines in a letter is an example of a feature. The system uses rules based on specific character properties to recognize original characters, such as the number of angled, crossing, or bending lines in a character.
Post-processing of images
During post-processing, AI is used to correct errors in the final file. One strategy is to train the AI on a glossary of concepts that are likely to appear in the document. To ensure that the AI’s output remains within the vocabulary, the AI’s output is limited to the predefined words and formats.
What are the types of OCR?
There are various types of OCR technologies classified by data scientists according to their applications and usage. Here are some examples:
- Simple optical character recognition software: This type of OCR engine operates using templates that it has for different text image patterns and typefaces. Character by character, the OCR program uses pattern-matching algorithms to compare the text images with its internal database. If the system matches the text word for word, it is called optical word recognition. This solution has limitations because it is impossible to capture and store every font and handwriting variation in the database.
- Intelligent character recognition software – modern OCR systems use intelligent character recognition (ICR) technology to read a text like a human would. By employing machine learning software, they use cutting-edge techniques to teach machines to behave like humans. The ICR system examines the text on multiple levels while processing the image repeatedly. It searches for various visual characteristics such as curves, lines, junctions, and loops, and then combines the findings from all these layers of analysis to produce the final product. ICR processes the photos one character at a time, but the procedure is quick and produces results in a matter of seconds.
- Intelligent word recognition (similar to ICR) – in that case the intelligent word recognition systems process entire word pictures instead of converting them into characters.
- Optical mark recognition – optical mark recognition is used to recognize a document’s logos, watermarks, and other text symbols.
How to enable Google Drive’s free OCR capabilities
You can enable Google Drive’s OCR capabilities by following the steps outlined below:
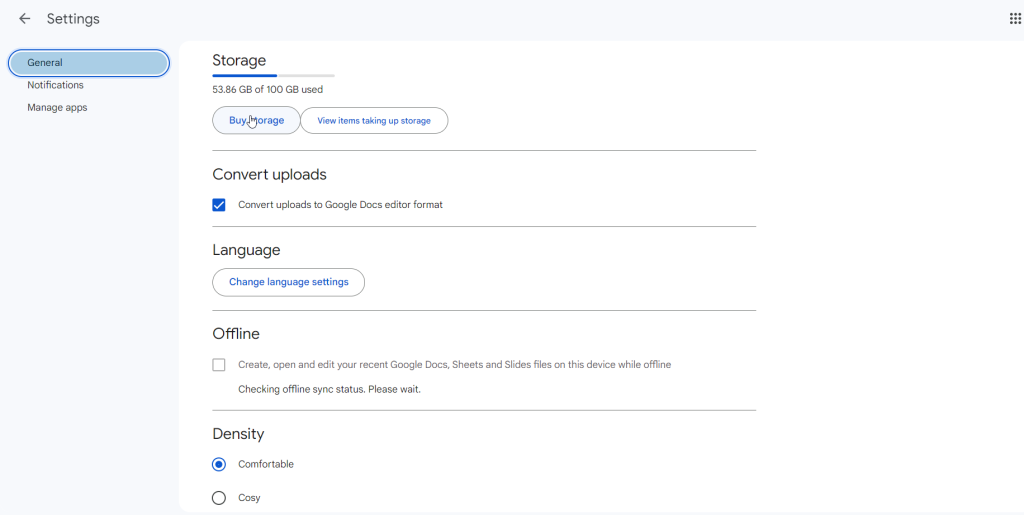
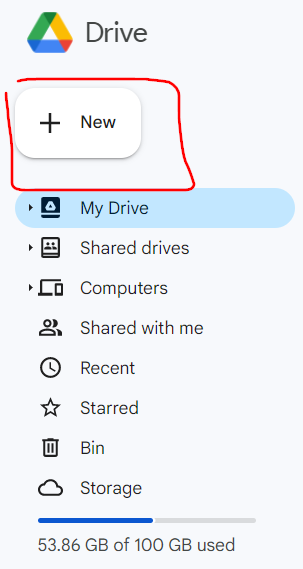
Step 1. Open Google Drive and click on the Gear icon. Here, Go to Settings.
Step 2. Make sure the box is checked under Convert uploads > Convert uploads to Google Docs editor format. This allows you to open image and PDF formats using Google Docs with the OCR feature.
Getting started with OCR using Google Drive
To utilize Google Drive’s built-in OCR capabilities, you need compatible files to extract text from. OCR is usually used on files and documents where copy-and-paste doesn’t work right out of the box.
The files that are compatible with OCR include:
- Photos or screenshots that are in JPG, PNG, or GIF format.
- PDFs.
There are other considerations and properties that need to be met for OCR to work properly, as outlined in Google’s official documentation:
- File size: files should be 2 MB or less.
- Resolution: text should be at least 10 pixels high to be recognized.
- Orientation: documents should be right-side up. If the image is facing the wrong way, it should be rotated.
- Language: the document should be in one of the supported languages.
- Font and character set: the most common fonts are the easiest for AI to recognize.
- Image quality: images should be sharp with even lighting and decent contrast.
Optimizing your files for OCR in Google Drive
To ensure the best results when using Google Drive’s free OCR tool, there are some steps you should follow when preparing your documents for scanning.
- Use a dedicated scanning app. Rather than using your phone’s camera, download a specialized scanning app like Microsoft Lens for Android or iOS or Adobe Scan for Android or iOS, which will produce crisp, high-quality scans with automatic lighting and filters.
- Upload your scans to Google Drive. Once you have scanned your documents, upload them to your Google Drive account in a folder that is easily accessible and organized. This will help you to keep track of your files and find them quickly when needed.
- Optimize images or PDFs in post-production. If you are unable to control the quality of your images or PDFs, you can still extract text from them using OCR, but the results may be less accurate. To improve accuracy, consider optimizing the images or PDFs in post-production by adjusting the lighting, contrast, and other factors.
How to convert an image file or PDF to text using Google Drive
In the following section, we will guide you through the process of using Google Drive’s built-in OCR to convert your image or PDF files to text. We will provide step-by-step instructions to help you get started.
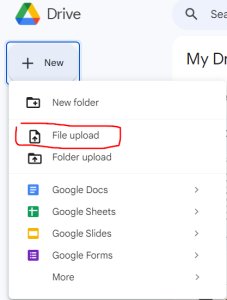
Step 1: Upload your file to Google Drive. If you have scanned materials from your phone, upload them to a folder in Google Drive that you can easily access.
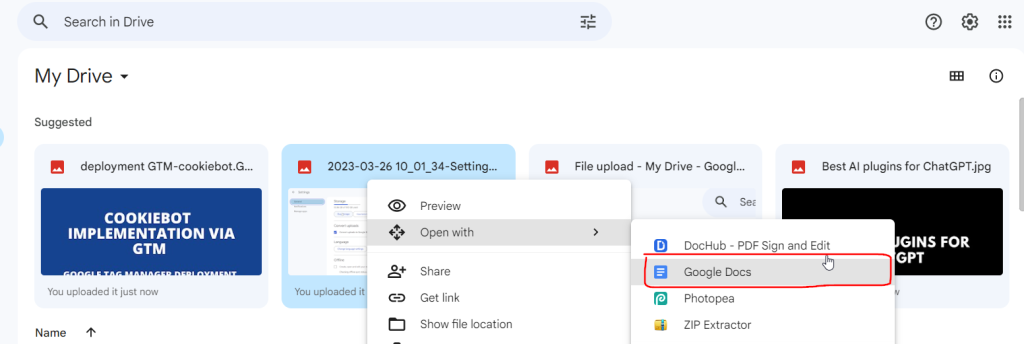
Step 2: Right-click on the file and select “Open with” followed by “Google Docs”.
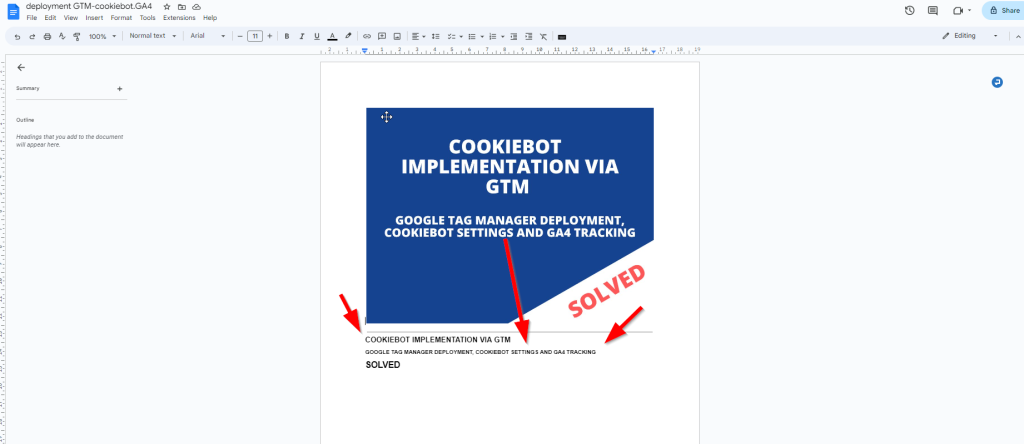
Step 3: Your image file will open in Google Docs with the extracted text displayed below it. You can now use the extracted text as needed by copying and pasting it into other documents or applications.
To give you an idea of how the process works, I have provided a few screenshots below of files that have been converted using OCR in Google Drive.
![]()
Get more advanced OCR capabilities with a free add-on
While Google Drive and Docs offer basic OCR functionality, many users require more advanced capabilities. For those users, we recommend downloading our free add-on, GetFileDrop.
GetFileDrop is an add-on for Google Sheets, Docs, and Drive that includes powerful optical character recognition tools to extract text from images and PDFs. With FileDrop, you can extract text directly from your Google Docs or Sheets files, without the need to access it through Drive. This is a significant improvement compared to having to create new Google Docs files every time you want to use OCR.
To begin using FileDrop for OCR, follow the steps below:
Step 1. Open Google Docs, Google Sheets, or Google Slides
Step 2. Download FileDrop from the Google Workspace Marketspace by going to this link.
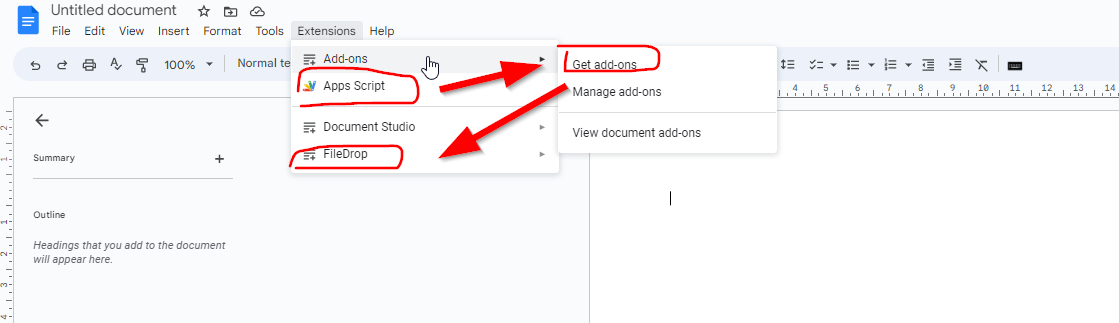
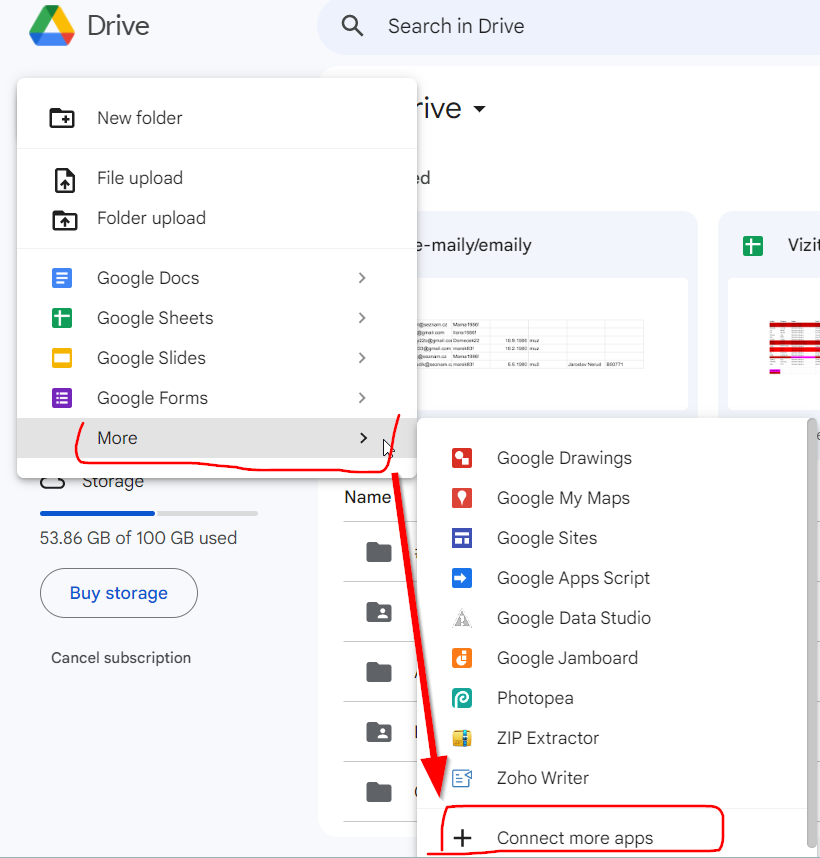
(or you can hit New > More > Connect more apps – and find in here the app by its name – see image below).
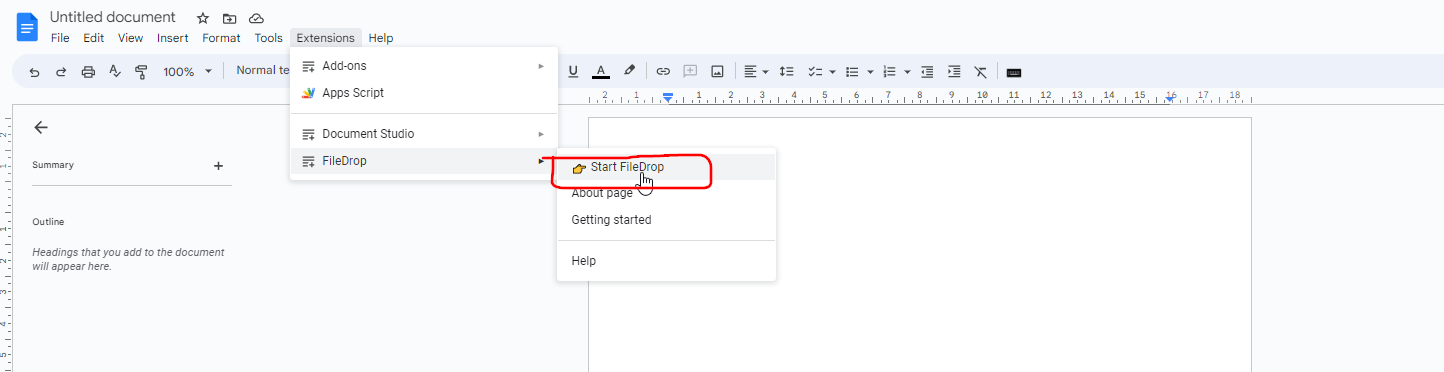
Step 3. Run FileDrop by going to Extensions > FileDrop > Start FileDrop.
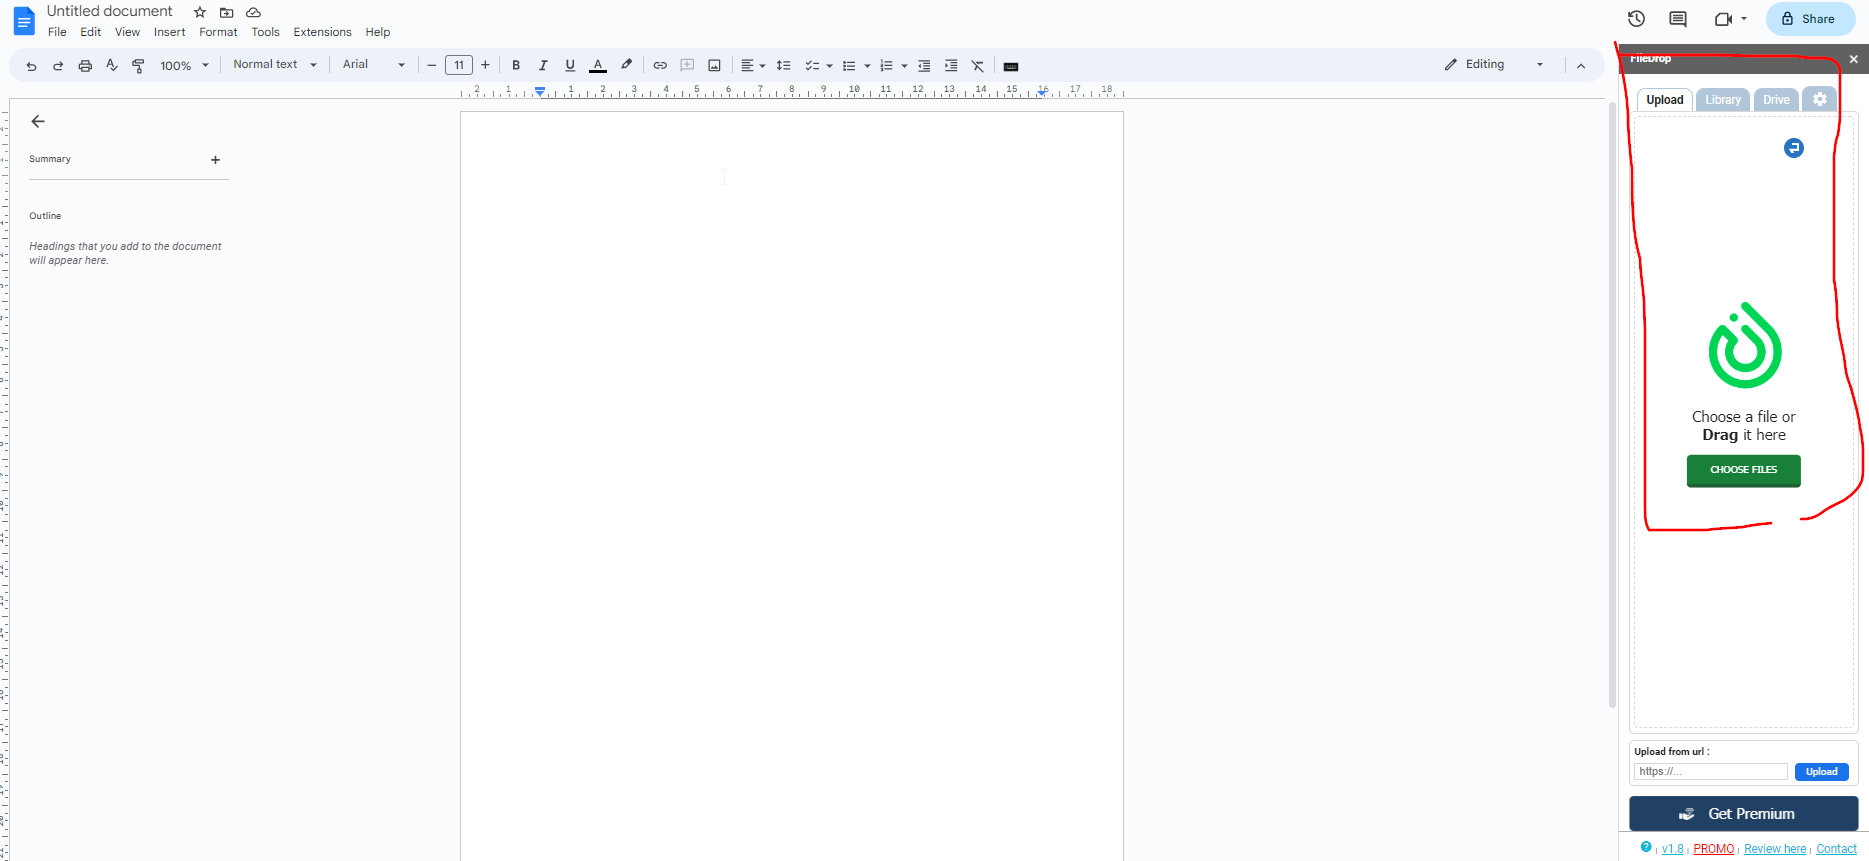
Step 4. Once FileDrop is open, drag and drop your file in the upload area. If the file is already in your Drive you can search for or open it from the Drive tab.
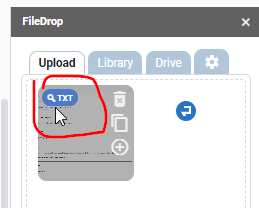
Step 5. Hover over the file and you will see the TXT with a magnifying glass icon in green color. Click on it and in a few seconds the text area will open with the extracted text.
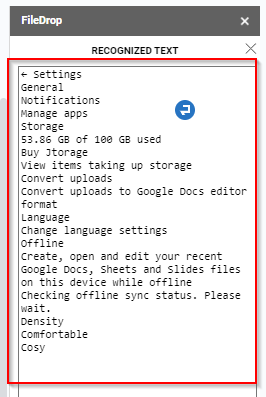
Step 6. The recognized text in the image will be displayed in a text area. You can insert the text in your Google Doc or Sheet or you can copy it and use it anywhere else.
Google Drive’s built-in Optical Character Recognition (OCR) feature is a useful tool that many people may not know how to use. With the steps outlined above, you can easily extract text from simple images and PDFs by uploading them to your Google Drive folders.
If you need a more powerful and efficient OCR tool, our free add-on FileDrop offers a range of features beyond OCR, such as drag-and-drop file management, file library space, and premium upgrades for even more functionality. By downloading FileDrop, you can streamline your workflow and boost productivity by doing OCR directly within your Google Docs or Sheets files.
Microsoft OneNote: How to extract text from images with built-in OCR feature for free
Here is a simple guideline for using OCR in Microsoft OneNote:
- Open OneNote and create a new page or navigate to an existing one where you want to add OCR text.
- Insert an image or PDF into the page by selecting “Insert” from the top menu and choosing “Pictures” or “File Printout”.
- Right-click on the image or PDF and select “Copy Text from Picture” or “Copy Text from Document” from the context menu.
- Paste the extracted text into your OneNote page.
Note that the OCR feature may not work perfectly for all images or PDFs, especially those with low image quality or unusual fonts. However, it can still be a useful tool for quickly extracting text from documents without having to manually type it out.
How to extract text from content and PDFs for free with Adobe Acrobat Reader DC’s built-in OCR feature
Here’s a guideline for using Adobe Acrobat Reader DC’s built-in OCR feature to extract text from images and PDFs:
- Open Adobe Acrobat Reader DC and click on “File” in the top left corner of the screen.
- Select “Open” from the drop-down menu and choose the image or PDF file you want to extract text from.
- Once the file is open, click on the “Tools” tab in the top menu bar.
- Under the “Tools” menu, click on “Enhance Scans”.
- In the “Enhance Scans” toolbar, click on “Recognize Text”.
- Select “In This File” if you only want to extract text from the current page, or “In Multiple Files” if you want to extract text from multiple pages or files.
- Choose the language of the text you want to extract and select “OK”.
- Acrobat will now begin to recognize the text in the image or PDF file. Once it’s finished, the recognized text will appear in a new layer over the original image or PDF.
- To save the extracted text, click on “File” in the top left corner of the screen and select “Save As”. Choose the file format you want to save the extracted text in and select “Save”.
That’s it! You have now successfully used Adobe Acrobat Reader DC’s built-in OCR feature to extract text from images and PDFs.
ABBYY FineReader OCR: Free guide on extracting text from images with built-in OCR feature
Here are the steps to use the ABBYY FineReader Online built-in OCR feature:
- Go to the ABBYY FineReader Online website.
- Click the “Choose file” button and select the image or PDF you want to extract text from.
- Choose the language of the document from the drop-down list.
- Select the output format for the text file, such as DOCX or XLSX.
- Click the “Recognize” button to start the OCR process.
- Once the OCR process is complete, you can download the text file.
ABBYY FineReader Online also offers additional features such as document conversion, PDF editing, and cloud storage integration.
Unlocking the power of Tesseract OCR: A step-by-step guide to extracting text from images for free
Here is a step-by-step guide on how to use Tesseract OCR to extract text from images and PDFs:
- Install Tesseract OCR on your computer: Tesseract OCR is open-source software that can be installed on Windows, Mac, and Linux. You can download it from the Tesseract OCR GitHub page: https://github.com/tesseract-ocr/tesseract.
- Prepare the image or PDF file: Ensure that the image or PDF file you want to extract text from is clear and easy to read. If it is an image, ensure that it is in a supported format such as JPEG, PNG, or TIFF.
- Open the command prompt: On Windows, press the Windows key + R, then type “cmd” and press enter. On Mac, open the Terminal app.
- Navigate to the directory containing the Tesseract OCR executable file: In the command prompt or Terminal, use the “cd” command to navigate to the directory containing the Tesseract OCR executable file.
- Enter the command to extract text: To extract text from an image, enter the following command: “tesseract [image filename] [output filename]”. To extract text from a PDF, enter the following command: “tesseract [PDF filename] [output filename] -c tessedit_create_pdf=1”.
- View the extracted text: Once the extraction process is complete, you can view the extracted text in the output file.
Note: Tesseract OCR also supports several command-line options that can be used to improve the accuracy of the text extraction. You can find more information on these options in the Tesseract OCR documentation.
Was this article helpful?
Support us to keep up the good work and to provide you even better content. Your donations will be used to help students get access to quality content for free and pay our contributors’ salaries, who work hard to create this website content! Thank you for all your support!
Reaction to comment: Cancel reply