
How to tweak / setup automatic receiving emails in Microsoft Outlook 365 or desktop version Outlook from different providers?
Why isn’t your email coming automatically?
If your email doesn’t arrive automatically, check that automatic email synchronization is turned on. You can check if this is the reason why your emails are not syncing by enabling the auto-sync option in your email client. The app will then automatically check for new emails and notify you when there’s a new message. You can enable automatic syncing from the email client’s settings menu.
This article explains how to adjust when Outlook sends and receives emails. Instructions apply to Outlook for Microsoft 365, Outlook 2019, Outlook 2016, Outlook 2013 and Outlook 2010, and Outlook 2007.
Once you’ve added an account to Outlook, you can change how often Outlook checks for new emails from each account as well as how often Outlook sends outbound messages from each account.
When using Outlook as an email client you may need to adjust the send/receive settings. You will see better results when you set the auto cycle to a lower value, such as five minutes or even as low as one minute.
How to setup automatic receiving emails in Outlook for Microsoft 365, Outlook 2021-2007
This guideline is valid for Outlook for Microsoft 365, Outlook 2021, Outlook 2019, Outlook 2016, Outlook 2013, Outlook 2010, and Outlook 2007.
How to setup automatic receiving emails in Outlook for Microsoft 365
This process is very easy. You will have to go to your outlook account on the web. Here’s the link: Outlook Web
- Open your desired Outlook / Office 365 mail account.
- Click on settings.
- Scroll down and click on “view all outlook settings”
- Click on Email
- Click on Sync Mail
- Scroll down till you see “POP and IMAP”
- Under POP options, Click on “Yes”
- Click on Save
- Done!
You can also check the same in this video if you do not know where to find this setting.
How to setup automatic receiving emails in Outlook (newer versions – Outlook 2021, Outlook 2019, Outlook 2016, Outlook 2013)

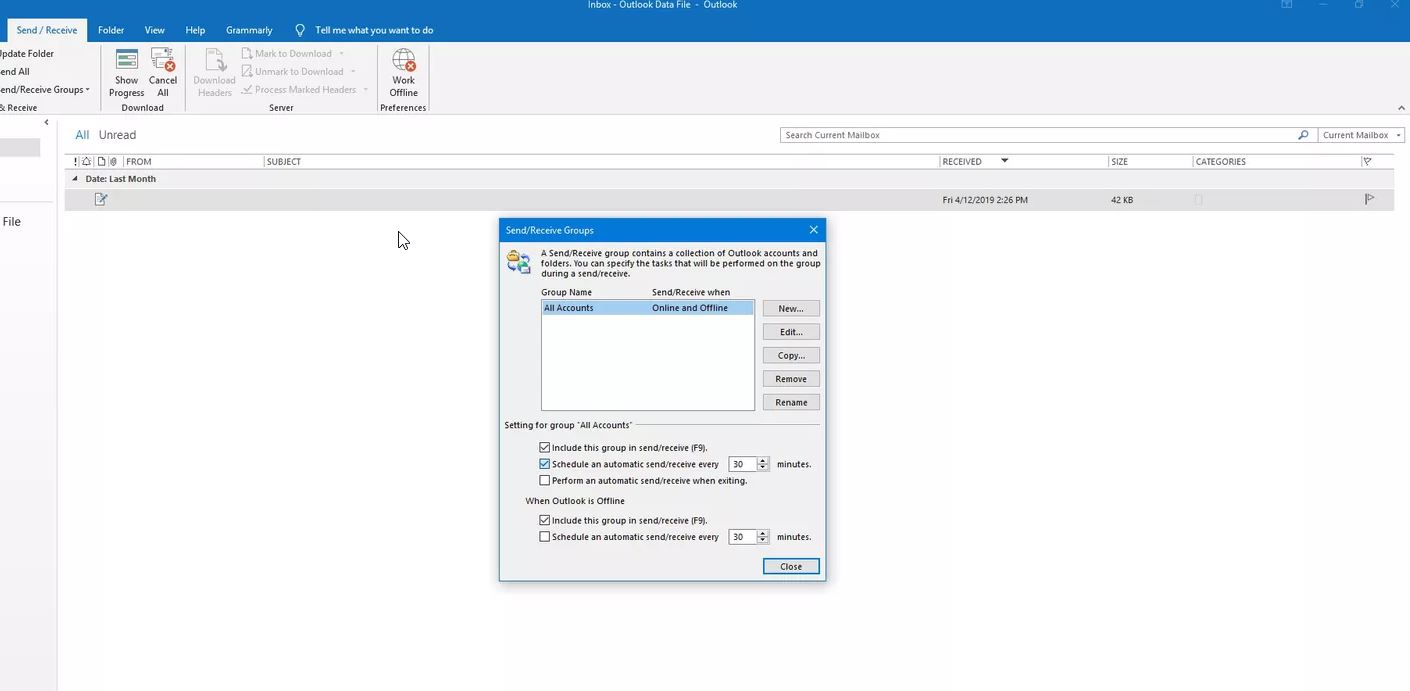
- Select Send/Receive > Send/Receive Groups > Define Send/Receive Groups.
- Select the group you want to change.
- If you only want to send and receive mail when you press F9, clear the first Schedule an automatic send/receive every n minutes option. If you frequently work offline, and you check the second Schedule an automatic send/receive every n minutes option, Outlook tries to connect and send and receive your messages at the interval you specify.
Choose the accounts included in periodic Outlook mail checking
Select the accounts included in periodic, automatic mail checking.
- In the Send/Receive Groups dialog box, highlight All Accounts.
- Select Edit.
- To add an account to automatic checking, choose the account and select the Include the selected account in this group checkbox.
- Select OK.
- To set up a new mail-checking group that downloads and sends mail for individual accounts on a different schedule, select New.
- In the Send/Receive Group Name dialog box, enter a name for the sending and receiving schedule, then select OK.
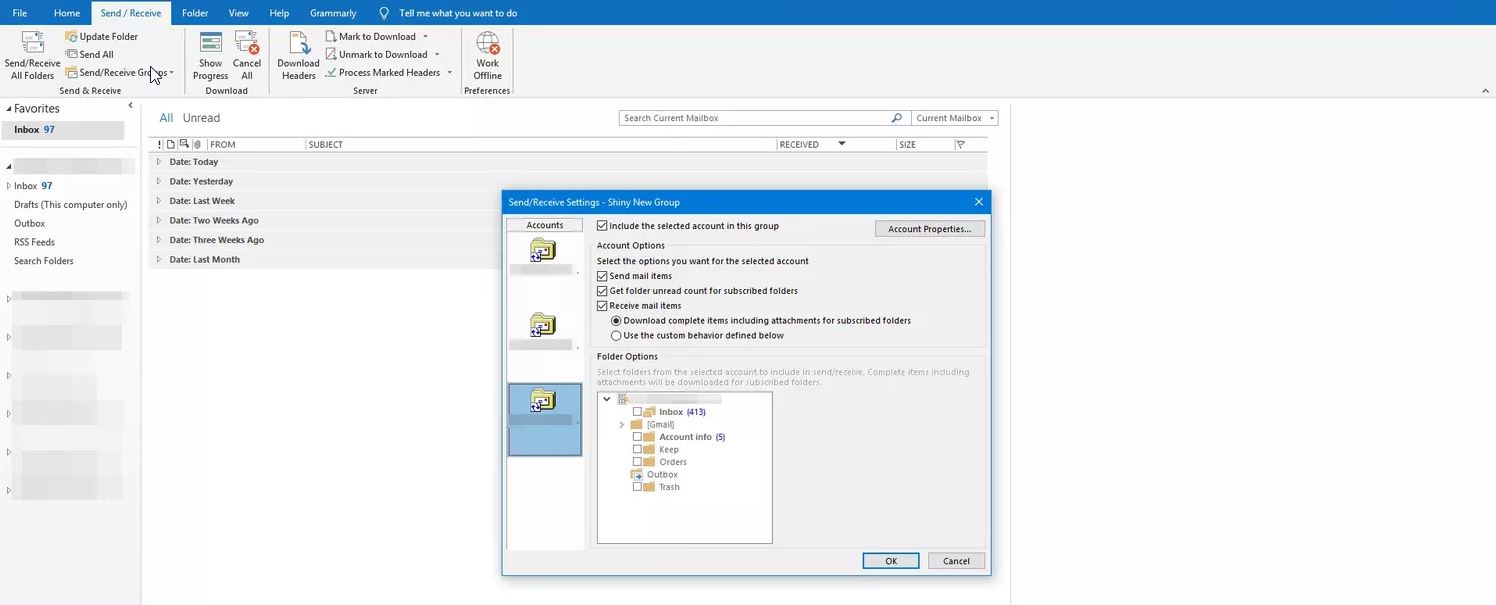
- In the Send/Receive Settings dialog box, go to the Accounts pane and select the account you want to include in the schedule.
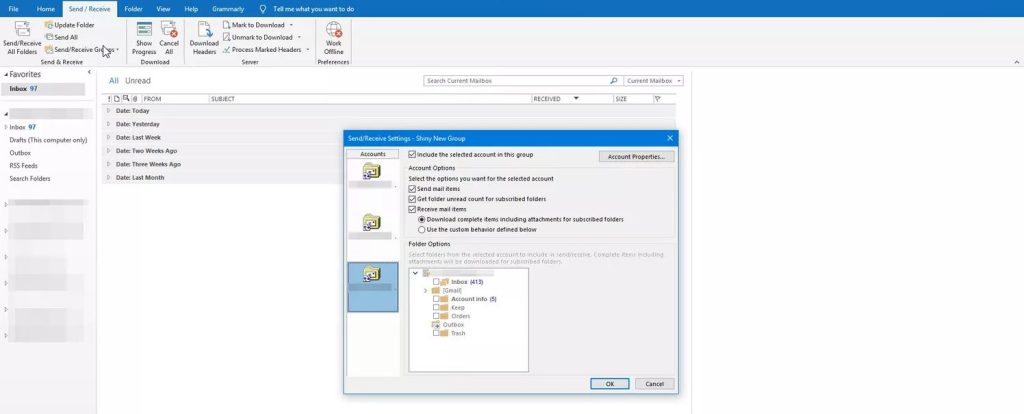
- Select the Include the selected account in this group check box.
- Under Receive mail items, select Use the custom behavior defined below. Or, select Download complete items including attachments for subscribed folders.
- In the Account Options and Folder Options sections, choose which items to send, receive, and download.
- Repeat steps 7, 8, and 9 for each account you want to add to the schedule.
- Select OK.
- In the Send/Receive Groups dialog box, highlight the new send/receive group you created.
- Select the Schedule an automatic send/receive every check box and choose the desired mail checking interval.
- Select Close when you’re finished.
How to remove an account from automatic send/receive
By default, all of your accounts are included in the All Accounts group. If you want to remove just one or two accounts from the automatic send/receive cycle, edit the All Accounts group and remove those accounts. This won’t affect your ability to send and receive messages to and from these accounts manually.
- Select Send/Receive > Send/Receive Groups > Define Send/Receive Groups.
- Select All Accounts > Edit.
- Select the account you want to remove and uncheck the Include the selected account in the group option, then select OK.
To manually send email from an account you’ve removed from automatic send/receive, elect to Send/Receive > Send/Receive Groups, and then select the account you want to send and receive manually.
Follow these instructions to change the time to check for new messages in Outlook* 2010 or Outlook 2007.
How to setup automatic receiving emails in Outlook 2010
- Click File > Options.
- In the Options window, click Advanced, scroll down, and click the Send/Receive button.
- Under the Setting for group All Accounts section, select the Include this group in send/receive (F9) check box and select the Schedule an automatic send/receive every “XX” minutes check box. Use the up and down arrows to set the desired minutes.
How to setup automatic receiving emails for Outlook 2007
- Click Tools > Options.
- Click the Mail Setup tab. Select the check box Send immediately when connected, and then click Send/Receive button.
- Make sure the group All Accounts is selected and select the check box Schedule an automatic send/receive every. Change the value for minutes as desired.
Or if you need to do that for specific groups to send and receive emails settings from other providers for MS Outlook 2007:
- Select Tools > Send/Receive > Send/Receive Settings > Define Send/Receive Groups.
- Select the Send/Receive group that contains the e-mail account that you want to change.
- Under Setting for group send/receive group name, select the Schedule an automatic send/receive every n minutes check box.
- Enter a number between 1 and 1440. The latter will schedule an automatic send/receive once daily for all accounts in this group.
- If you want, you can specify a schedule for send/receive when Microsoft Outlook is offline. Under When Outlook is Offline, select the Schedule an automatic send/receive every n minutes check box.
- Enter a number between 1 and 1440. The latter will schedule an automatic send/to receive once daily.
How to fix Outlook when it’s not receiving emails
If you’re expecting an email but it never arrives or new messages are missing in Microsoft Outlook, troubleshooting can help you identify and fix the problem. Instructions apply to Outlook 2019, 2016, 2013, and 2010 for Windows; Outlook for Mac 2019, 2016, and 2011; and Outlook.com, Microsoft’s free web-based email client.
Why am I not receiving emails in Outlook?
There are several reasons why you may not receive new emails. Here are some possible causes:
- No Internet connection.
- The message goes to the Junk Mail folder.
- Mail records are corrupted.
- Wrong email rule.
- Outlook is configured to work offline.
- Outlook may not work. (Read the guideline “More info on what to do when Outlook is down?” to help determine if this is the problem.)
More info on what to do when Outlook is down?
This part is aimed at explanation how to check if Outlook.com is down on Microsoft’s side or if it’s a problem with your computer or local network, and how to fix common causes. best. The instructions in this article apply to all Microsoft Outlook, Hotmail, MSN, and Live services.
How to know Outlook.com is down?
You can’t access your email and don’t know why? Check these places first to see if Outlook is down for everyone or not.
How can you fix an error when Outlook not receiving emails?
- Visit the Microsoft 365 Service Status page to see the service status of Outlook.com. If a green checkmark displays next to Outlook.com, then from Microsoft’s perspective, everything is working correctly with the Outlook.com service.If the website shows a red or yellow icon next to Outlook.com, then Microsoft is currently experiencing a problem and is aware of the problem. The comments next to this icon can help you figure out what’s going on.
- Another way to check if the Outlook.com website is down is to use a web service such as Down For Everyone Or Just Me or Down Detector. If those websites show that Outlook.com is down after entering the web address, chances are it’s down for everyone or for a vast majority of users. If this is the case, wait for Microsoft to fix the issue. Down Detector shows how many users reported issues over the last 24 hours or longer. Down Detector checks if Outlook.com is experiencing problems sporadically (working sometimes, but not loading other times).
- If you’re a Twitter fan, search it for #Outlookdown. If the site is down for everyone, somebody has probably already tweeted about it. Pay attention to the tweet timestamps to ensure that they’re not discussing an earlier time when Outlook was not working.
If problems are being reported, you’ll likely need to wait until Microsoft fixes the problem. If no one else is reporting a problem with Outlook across these services, though, the problem is almost certainly on your side.
How to Fix Outlook.com Issues
If the Outlook.com status is up and running but you can’t sign in, the problem may be with your computer, network, or service provider.
To troubleshoot Outlook.com if you see a green checkmark on the service status page but you’re having problems with your mail service, try these fixes in the order presented:
- Close and reopen your web browser. There could be a memory issue or some other temporary problem that gets cleared away upon restart of the program.
- Clear the browser cache. If you only want to clear the cache for the page you’re on, press and hold the Ctrl key, then press F5. This clears the cache and reloads the Outlook.com page.
- Restart your computer. This clears temporary files and other cached files that prevent the Outlook problems to resolve even though the service is backed up.
- Flush the DNS cache. Press the Start button, enter cmd, and select the command prompt app. Then, type ipconfig /flushdns and press Enter.DNS servers identify the IP address of domains that you connect to with a browser. When IP addresses change, cached DNS settings cause your browser to continue to access the old, incorrect IP address.
- Restart your router. Unplug your home router, wait 30 seconds, and then plug it back in. The router reconnects to your Internet Service Provider (ISP) and re-establishes your internet connection. Connect to Outlook.com to see if the issue is now resolved.
If Outlook.com is still down after you perform these steps, your internet service provider is likely denying access to the website. Call your ISP to check if other subscribers are having similar issues.
How do you fix errors when Outlook not receiving emails?
This issue can occur in a Windows system, macOS, and the online version of Outlook.
- Restart Outlook. On occasion, Outlook (and other applications) may hang up, or stop working altogether. Closing and re-opening Outlook could clear up any issues that prevent the receipt of emails.
- Check the internet connection. If you see Disconnected, Working Offline, or Trying to connect statuses on the Outlook status bar, there may be some network connectivity issues, or Outlook is set to work offline. To change Outlook to work online, select Send/Receive > Preferences > Work Offline.
- Check offline settings. If you have issues on a Mac and have disabled Work Offline, you may need to sign in to your email account and change your settings.
- Check other Outlook folders for messages. If you don’t see new emails in the Inbox, those messages may be going to the Junk Email folder. If you use Outlook.com, those messages may be in the Other section.
- Check your other devices. You may have downloaded the message to another device such as a phone, tablet, or work computer. If the POP email in Outlook is not set to save a copy on the server, your missing email may be on the device where you first checked your email.
-
Create a new Outlook profile. Outlook uses something called a profile to store information about the email accounts you set up and the configuration settings you chose to determine where your email messages are delivered and stored (such as on the mail server or your computer). If your Outlook profile is corrupt, it can cause you to stop receiving emails.
- Clear the Outlook cache. Sometimes emails get stuck in the incoming processing in Outlook, which sometimes stores these emails in a hidden ItemProcSearch folder. Clearing the cache should reveal the missing email.
- Check your email rules. If you created any rules, it’s possible that your emails are being routed away from your Inbox, forwarded to another email account, or deleted.
FAQ for how do you fix Outlook when not receiving emails?
How do you archive emails in Outlook?
Outlook automatically archives emails by default, but if you want to archive something manually you can. Select File > Info > Tools > Clean up old items and choose the Archive this folder and all subfolders option. Select which folders you want to archive.
How do you block emails in Outlook?
To block someone in Outlook, select the messages or senders and select Junk > Block (or Spam > Block depending on your version of Outlook). To mark an email as spam, select it and choose Junk > Junk (or Spam > Spam).
How do you auto-forward emails in Outlook?
Select Settings > View All Outlook Settings > Mail > Forwarding. From here, select Start forwarding then enters the address you want to send your mail to and select Save. Select the Keep a copy of forwarded messages check the box if you want to keep copies of your forwarded emails in Outlook.
How do you search emails in Outlook?
The search bar is located on the Outlook ribbon. Use it to search for a name, subject, or phrase. Use quotation marks around a set of words to search for that exact phrase.
How do you group emails in Outlook?
To create contact groups in Outlook, go to the Navigation bar and choose People, then go to Home > New Contact Group and enter a name for the group. Next, select Contact Group > Add Members and pick from one of the offered options (Select From Outlook Contacts, Select From Address Book, or Select New E-mail Contact). Add contacts and select OK, then choose Save & Close.
How do you back up Outlook emails?
Select File > Open & Export > Import/Export > Export to a file > Next > Outlook Data File (.pst) > Next. Choose the folder you want to back up and select Next, then choose a location and name for your backup file. Select Finish to complete the backup process.
How to fix e-mail messages are not automatically sent or received at startup in Outlook
If you want to limit how often you check messages or want to manage your inbox more efficiently, set Outlook to check for new messages every few minutes or hours. You can even choose which email accounts to check and when to check them. The fact that Outlook periodically checks for new messages means that messages from the included accounts are also retrieved as soon as Outlook starts. Configure Outlook to automatically check for and retrieve new messages on a schedule.
Symptoms
When you start Microsoft Outlook, Outlook does not automatically perform a send-and-receive operation to download messages from the server.
Cause
This behavior can occur because of a damaged Send/Receive group within Outlook.
Resolution for Outlook 2007 and earlier versions
To resolve this behavior, create a new Send/Receive group in Outlook:
- On the Tools menu, point to Send/Receive Settings, and then select Define Send/Receive Groups.
- Under Group Name, select the group, and then select Copy.
- Under Send/Receive Group Name, type the new group name, and then select OK.
- Under Group Name, select the old group name.
- Under both When Outlook is Online and When Outlook is Offline, clear the check box for Include this group in Send/Receive (F9).
- Select Close.
- Quit Outlook, and then restart Outlook.
Resolution for Outlook 2010 and later versions
To resolve this behavior, create a new Send/Receive group in Outlook:
- Select File, and then select Options.
- Select the Advanced tab.
- In the Find Send and Receive section, select Send/Receive.
- Under Group Name, select the group, and then select Copy.
- Under Send/Receive Group Name, type the new group name, and then select OK.
- Under Group Name, select the old group name.
- Under both When Outlook is Online and When Outlook is Offline, clear the check box for Include this group in Send/Receive (F9).
- Select Close.
- Quit Outlook, and then restart Outlook.
Summary: The sync Issues folder and messages in its subfolders can’t be ignored as they can quickly fill up your mailbox and lead to a mailbox full error if the causes behind the sync issues are not fixed. In this post, we have discussed the Sync Issues folder, shared the reasons behind the Sync Issues, and how to safely resolve them and avoid exceeding your mailbox quota.
The Sync Issues folder is a special mail folder in MS Outlook that stores messages containing information on synchronization issues and error logs experienced by the client. These messages are sent by the mailbox server, such as Microsoft Exchange, to inform users about the problems encountered while synchronizing the emails or other mail items in Outlook to or from the mailbox server.
By default, Sync Issues folder and its subfolders are not visible in Outlook. To view the folder and its subfolders, click the three dots at the bottom navigation pane and choose ‘Folders.’
It contains three subfolders, which are as follows:
Local Failures
This Sync Issues subfolder stores information on mail items that could not be sent to the mailbox server from the local Outlook data file.
Conflicts
This Sync Issues subfolder stores multiple copies of conflicting mail items in the mailbox that can significantly inflate the mailbox size as Outlook tries to sync the mail items again and again.
Server Failures
This Sync Issues subfolder stores mail items that Outlook could not synchronize with the mailbox server.
If you open the email in Sync Issues or any of its subfolders, you may come across error messages, such as:
09:18:17 Synchronizer Version 15.0.5267
09:18:17 Synchronizing Mailbox 'Michal Krcmar'
09:18:17 Synchronizing Hierarchy
09:18:17 Synchronizing server changes in folder “Folder Name’
09:18:17 Downloading from server ‘BA34D64HGS-CE2B-4EB2-4D64HGE2@krcmic.com’
09:18:17 Syncmonitor triggered for ;Folder Name’ (0x80004005)
09:18:17 Error synchronizing folder
09:18:17          [80004005-501-4B9-560]
09:18:17          The client operation failed.
09:18:17          Microsoft Exchange Information Store
09:18:17          For more information on this failure, click the
URL below:
09:18:17          http://www.microsoft.com/support/prodredirect/outlook2000_us.asp?err=80004005-501-4b9-130
09:18:17 Done
09:18:17 Microsoft Exchange offline address book
09:18:17 Download successful
Reasons for Sync Issues
Sync issues in the Outlook client may occur due to one or more of the following reasons:
- Oversized or large OST file
- Faulty or incompatible Add-ins
- Network connection/firewall issues
- Corrupt or damaged Outlook profile
- Hardware or software issues
Further, it may also occur when,
- The email or mail items deleted or changed no longer exist in your mailbox or the item was already deleted from the mailbox.
- The Exchange Server cannot delete or perform the requested changes to the item.
Solutions to Fix Sync Issues in Outlook
Although the Sync Issues folder can be safely ignored in most cases, it can quickly increase the mailbox size and fill up the default Outlook mailbox quota in some cases which can lead to sending/receiving errors, new synchronization errors, and failed message deliveries.
When the mailbox is full, the synchronization stops between the Outlook client and mailbox server, leading to further problems, such as:
- Failure in sending or receiving new emails
- Outdated mailbox or mismatch in the number of emails between Outlook and Outlook Webmail (OWA).
- Error codes, such as “Mailbox size exceeds error 0x8404060c” while manually syncing the mail items in Outlook.
Thus, fixing the Sync Issues is critical. Follow these solutions to fix the problem.
Note: It’s critical to read the messages received in the Sync Issues folder to specifically address the problem and permanently fix it for further issues.
Check Network Connection
Synchronization requires an active network connection with the mailbox server. An unreliable and poor network connection or firewall settings can obstruct Outlook from synchronizing the mail items stored in the IMAP OST file to the mailbox server. Similarly, if the mailbox server is down, it can prevent Outlook from synchronizing the mail items.
To troubleshoot the issue, try reconnecting the network cable or WLAN. Then check the internet connection and firewall settings. You may also contact your IT support to ensure a network firewall isn’t blocking the mail server. Also, log in to your email account using a web browser to ensure your account is active and the server is available.
Repair OST File
You can use the OST integrity check tool (SCANOST.exe) in Outlook 2003 and 2007 or the Inbox Repair tool (ScanPST.exe) in Outlook 2010 and later versions to try fixing the errors or repair the corrupted OST file. This may help resolve the Sync Issues problem in your Outlook client.
The steps are as follows:
In Outlook 2003 or 2007
- Run the ScanOST.exe.
- Select the profile name where you are experiencing the issues from the list and click Connect (if prompted).
- Select the desired option and let the tool find the issues.
- Click the Repair Errors checkbox.
- Click begin Scan.
In Outlook 2010 and later versions
- Launch the ScanPST.exe tool. Refer to our article on how to find ScanPST location.
- Click Browse and select the OST file associated with your email profile.
- Click Start.
- After the scan, click Repair.
- The tool will try to fix the inconsistencies and errors found in the OST file. Once finished, start Outlook.
This may fix the Sync Issues in your Outlook if caused by an inconsistent OST file.
Setup a new Outlook profile
By setting up your email account under a new Outlook profile, you can replace the corrupt one and may fix the Outlook Sync Issues.
The steps to set up a new profile in Outlook are as follows:
- Open Control Panel, search, and click on Mail.
- Click Show Profiles > Add.
- Enter your new profile name (type any name) and click OK.
- Configure your IMAP, Exchange, or Office 365 email account, and then click Next > Finish.
- Select ‘Always use this profile’ and then choose the newly set up Outlook profile from the dropdown.
- Click OK and then restart Outlook.
Change the root folder path
When Outlook fails to detect the default root folder path, it may lead to sync issues in Outlook. However, you can manually set the root folder path by following these steps and resolving the problem.
- In Outlook, navigate to File > Account Settings > Account Settings and double-click on your email account.
- Click More Options… > Advanced.
- Check if the root folder path is set to Inbox. If not, choose Inbox and click Save.
- Exit and restart Outlook.
- After restarting, go to the Send/Receive tab and click Update Folder.
- This will start the synchronization. Wait for it to finish and then check if there’re new messages in the Sync Issues folder.
Resync the mail folders
If the messages in the Sync Issues folder indicate a problem with a specific folder, you can try to resync the folder in Outlook by following these steps:
- Right-click on the folder and choose Properties.
- Click Clear Offline Items > OK.
- After clearing the offline items, click the Update Folder option under the Send/Receive tab.
Rebuild Outlook data file (OST)
If the sync issues are caused by a faulty OST file, you can fix the problem by recreating or rebuilding the OST file.
The steps are as follows:
- In Outlook, navigate to File > Account Settings > Account Settings and click on the Data File tab.
- Choose the email account and click ‘Open file location….’ Alternatively, you can right-click on your email profile in Outlook (left pane) and choose Open File Location to open the folder location where the default OST is stored.
- Close Outlook and copy the default OST file to a safe location for backup.
- After the backup, delete the OST.
- Start Outlook. This will recreate a new OST file.
After rebuilding the new OST file, Outlook will start synchronizing the mail items. This should fix the Outlook Sync Issues.
Conclusion for how to fix e-mail messages are not automatically sent or received at startup in Outlook
By following the solutions discussed in this guide, you can fix the Sync Issues and avoid messages in the Sync Issues folder from filling up your mailbox and leading to a mailbox full or a synchronization error. When nothing works to fix the problem, you can switch to the online mode or recreate the OST file.
After the OST file is recreated and synchronization is finished, you will see ‘All folders are up to date in the Outlook status bar. Make sure to check all mail folders to ensure all mail items are synchronized from the server. However, if you don’t find your recent or newer mail items after synchronization is finished, you can use an OST to PST converter tool, such as Stellar Converter for OST to convert the backup OST file into PST format and import the converted PST file into your Outlook to restore the missing mail items. Besides, the software can also extract mail items from an orphaned, inaccessible, or encrypted Outlook OST file and directly export the items to an existing Outlook profile, Office 365, or live Exchange mailbox with complete integrity.
FAQ for how to fix e-mail messages are not automatically sent or received at startup in Outlook
How do I fix slow Outlook IMAP folder synchronization issues?
You can try to fix slow Outlook IMAP folder synchronization issues by going to File > Info > Account Settings > Account Settings > More Options > Advanced Settings and ensuring that the Root folder path says Inbox.
How do you sync Outlook emails?
You can manually sync Outlook emails via Send/Receive > Update Folders in Outlook.
Is it safe to delete the Sync Issues folder in Outlook?
Yes, it’s completely safe to delete the Sync Issues folder. However, deleting the folder won’t resolve the problem and the folder will appear again with new messages.
Where is the Sync Issues folder in OWA?
The Sync Issues folder is hidden by default. You can click on the three dots at the bottom of the left pane and click the Folders option to view the Sync Issues folder.
Was this article helpful?
Support us to keep up the good work and to provide you even better content. Your donations will be used to help students get access to quality content for free and pay our contributors’ salaries, who work hard to create this website content! Thank you for all your support!
Reaction to comment: Cancel reply