
Google Analytics 4: How to Exclude Internal Traffic via IP Filter
How does Google Analytics 4 define internal traffic?
When it comes to website analytics, the term ‘Internal Traffic’ refers to the web traffic generated by individuals who are directly associated with a business, such as its employees, suppliers, or service providers, including developers. This type of traffic is considered internal as it originates from within the organization and is not the result of organic or external sources. Essentially, any visits to a website that come from those within the business, or its network are considered internal traffic. These people are not tracked because they are not your target audience.
Excluding internal traffic from GA4 reports is crucial, as it has the potential to significantly impact website usage metrics. Internal traffic, stemming from visits by employees, suppliers, and other service providers, can often distort analytical data and lead to inaccurate insights. Therefore, to ensure that website metrics are as accurate and reliable as possible, filtering out internal traffic from GA4 reports is a necessary step for businesses. By doing so, they can gain a clearer understanding of how their website is performing and make informed decisions based on factual data.
How can you remove internal traffic from GA4 analytics?
Follow these steps to remove internal traffic from being reported in your Google Analytics 4 property:
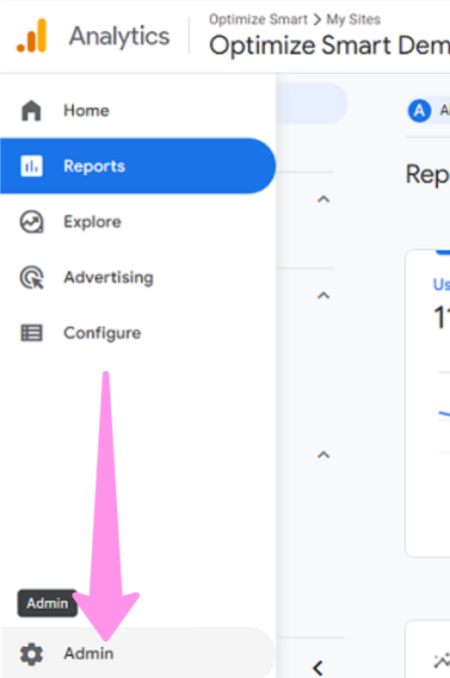
Step #1: Go to your GA4 property.
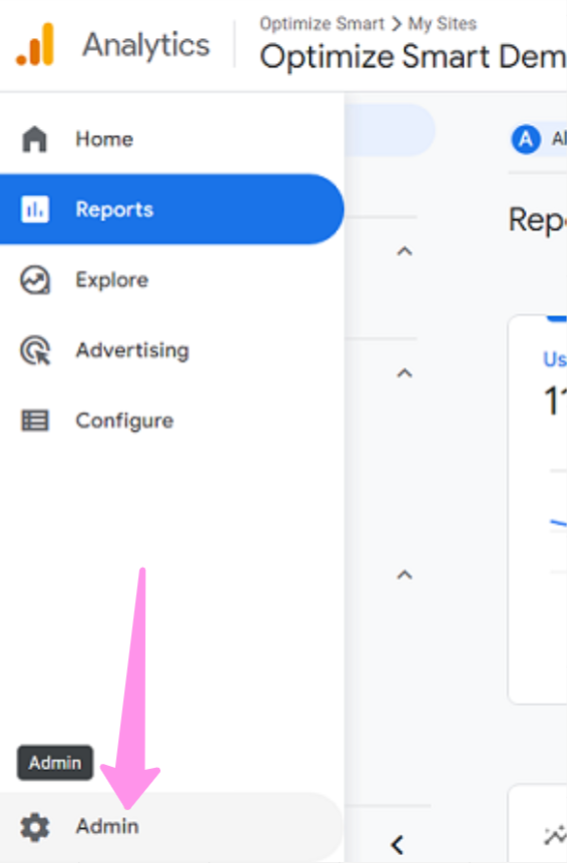
Step #2: Click on the ‘Admin’ link located at the bottom left-hand side of the page.
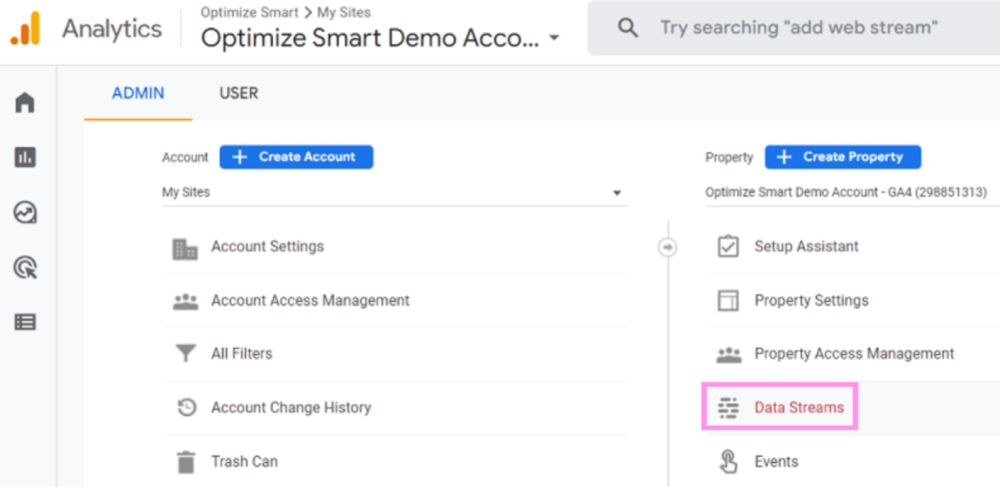
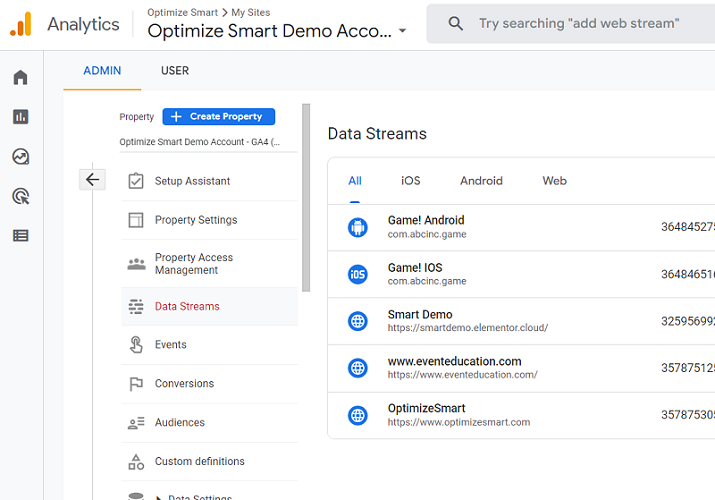
Step #3: Under the ‘Property’ column, select ‘Data Streams’.
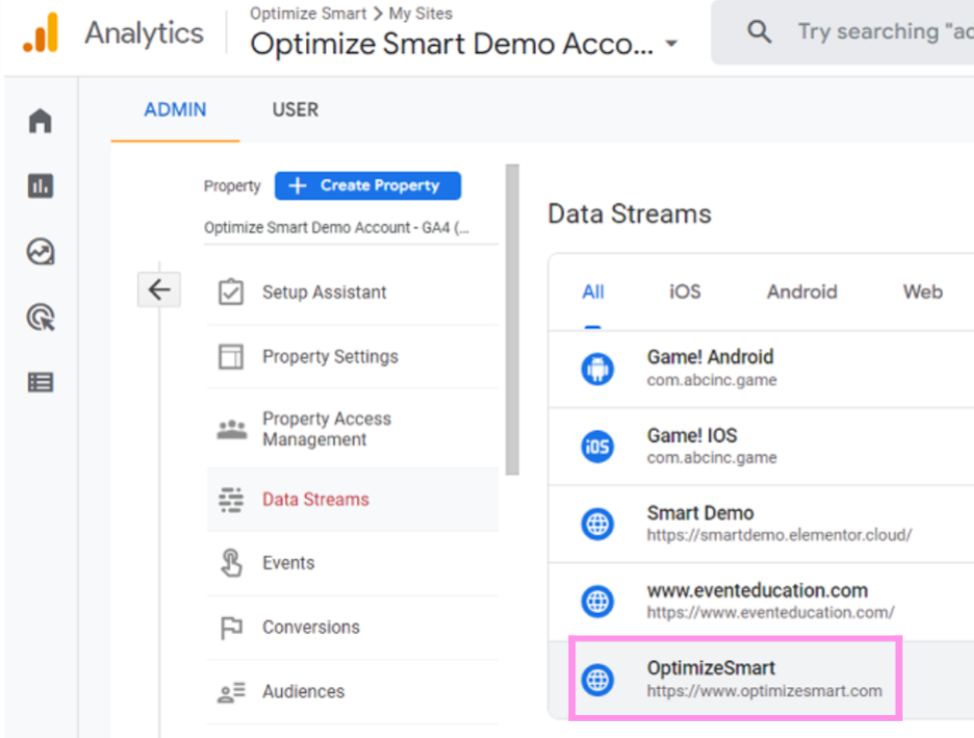
Step #4:Select the data stream that you wish to exclude internal traffic from by clicking on its name.
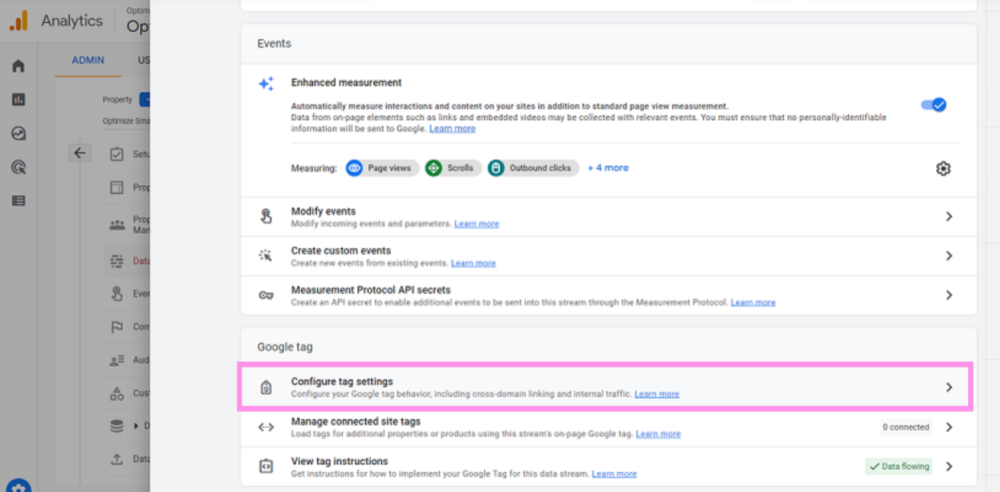
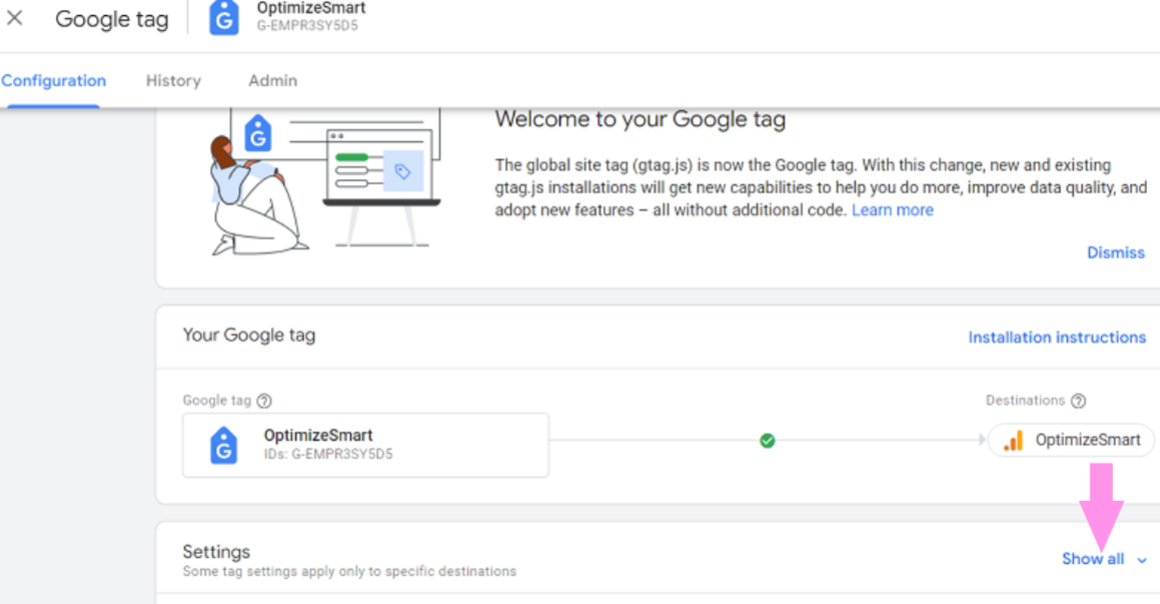
Step #5: Scroll down the page and locate the ‘Google tag’ section. Then, click on ‘Configure tag settings’.
Step #6: To access more options, scroll down the page and click on the drop-down menu labelled ‘Show all’.
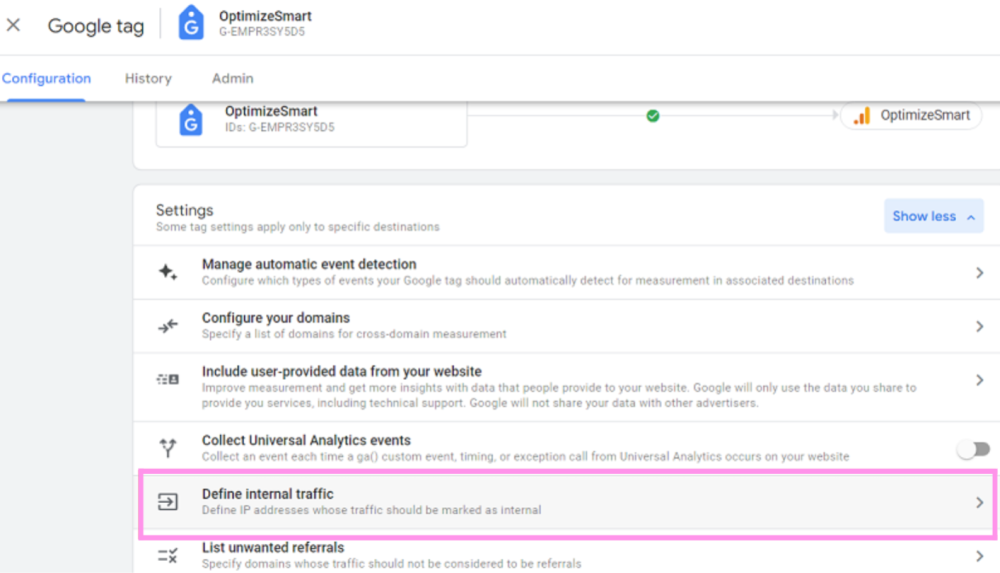
Step #7: Locate and click on ‘Define internal traffic’ by scrolling down the page.
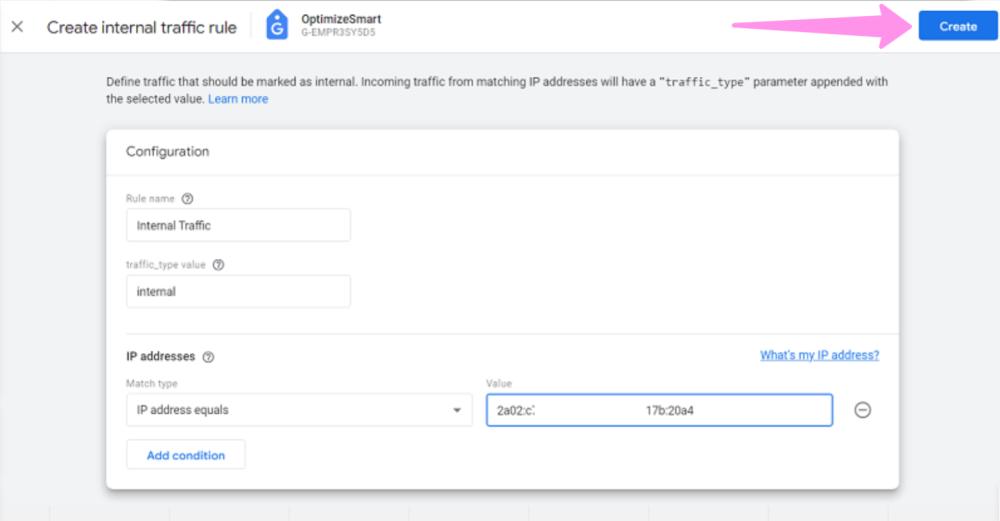
Step #8: Click the ‘Create’ button.
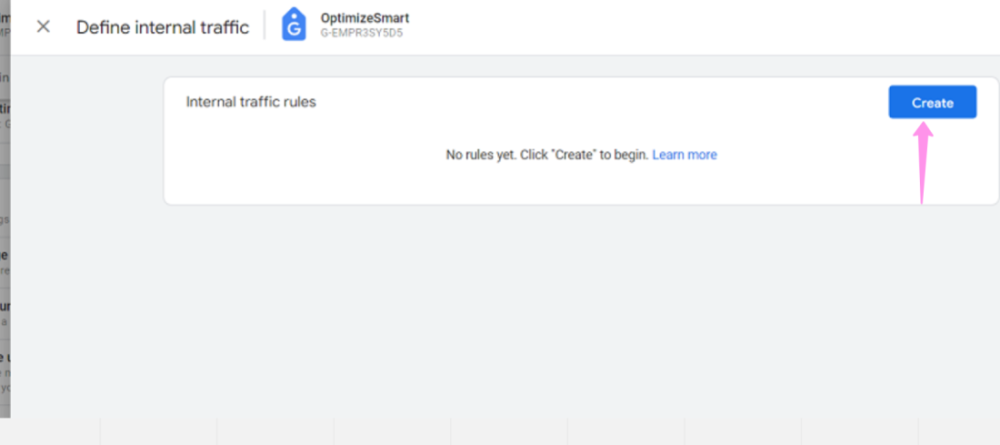
A screen similar to the one below should now be visible to you.
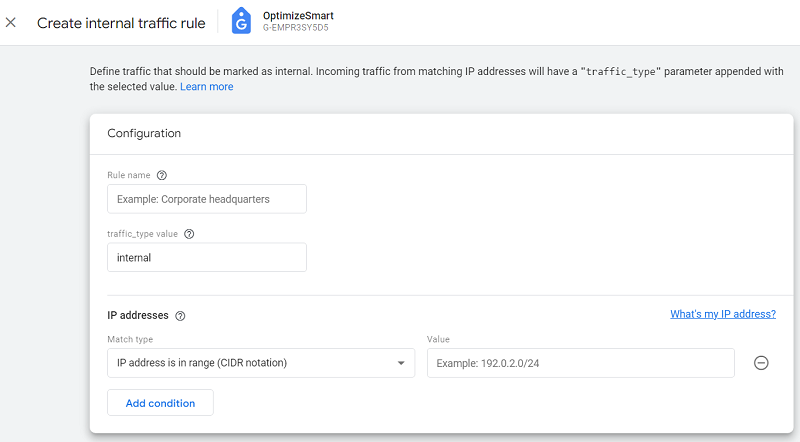
Step #9: Under ‘Rule Name’, assign a name to your filter by typing in the text box. For instance, let’s name our filter ‘Internal Traffic’.

Step #10: Since we are creating a filter to exclude internal traffic from the website, keep the ‘traffic_type value’ as ‘internal’.
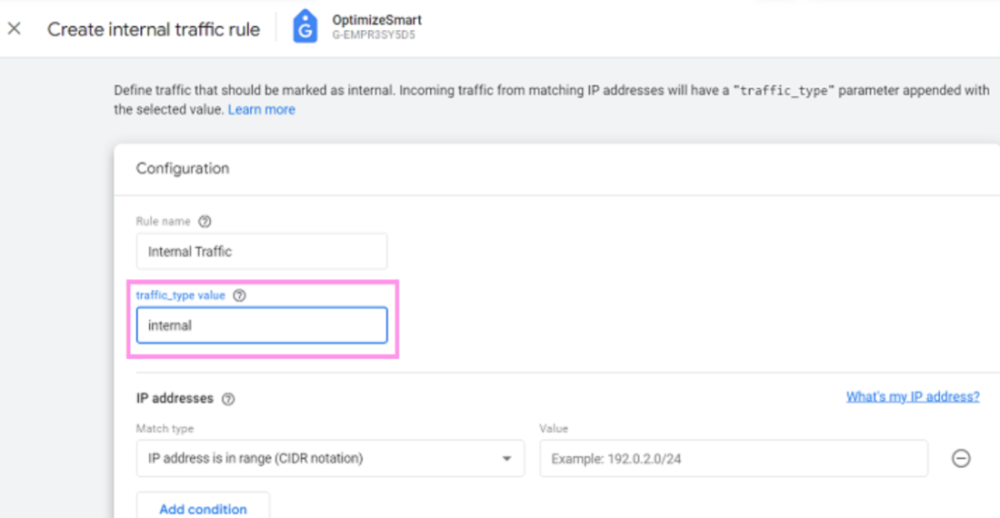
It is possible to modify the ‘traffic_type value’ to a different parameter if you want to use another identifier for internal traffic.
Please note that the value you set for ‘traffic_type value’ in the data filter settings will be utilized in the following step.
Step #11: Under ‘Match Type’, select the drop-down menu.
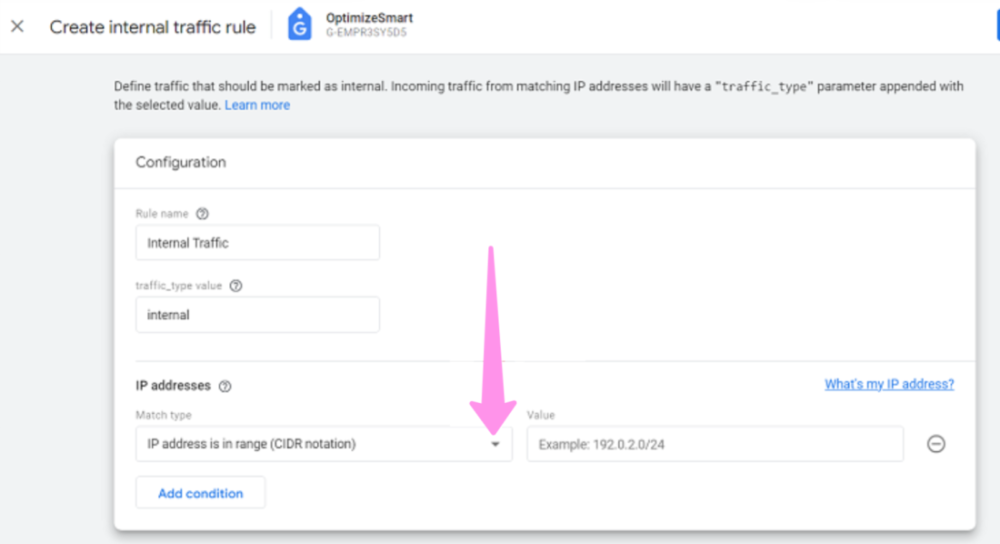
A drop-down menu should now be visible to you, similar to this:
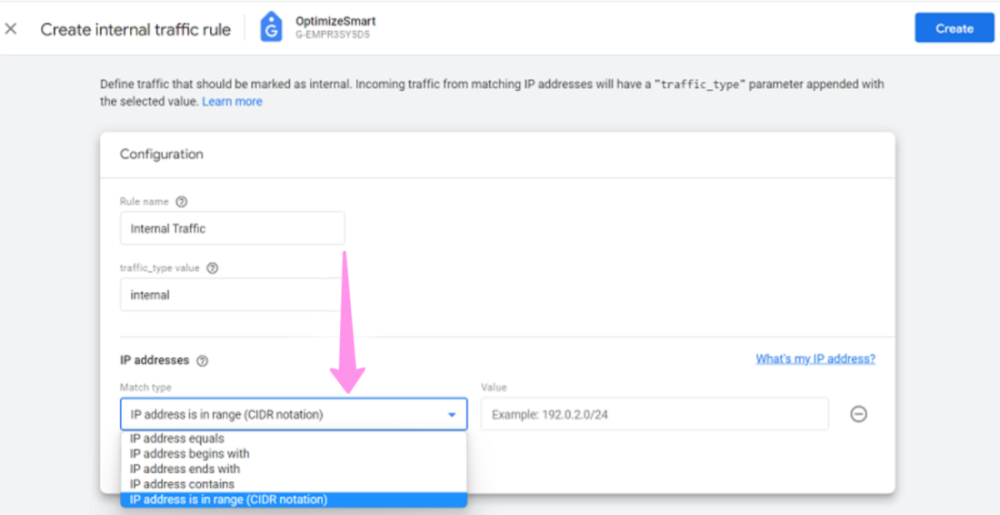
IP address equals: This option will only match a single IP address, such as ‘125.204.156.26’.
IP address begins with: This option will match all IP addresses that begin with the entered input.
For instance, if you enter ‘125’ as the input it will match ‘125.204.156.26’ but nor ‘129.204.156.26’.
The ‘IP address contains’ option will match all IP addresses that include the provided input.
For instance, if you enter ‘125’, it will match ‘125.204.156.26’ and ‘190.125.156.28’, but not ‘167.204.156.26’.
The default option, ‘IP address is in range (CIDR notation)’, will match a range of IP addresses.
For example, ‘128.208.156.28/32’ would match only the IP address ‘128.208.156.28’. However, ‘128.208.156.28/24’ would match any IP address between ‘128.208.156.0’ and ‘128.208.156.255’.
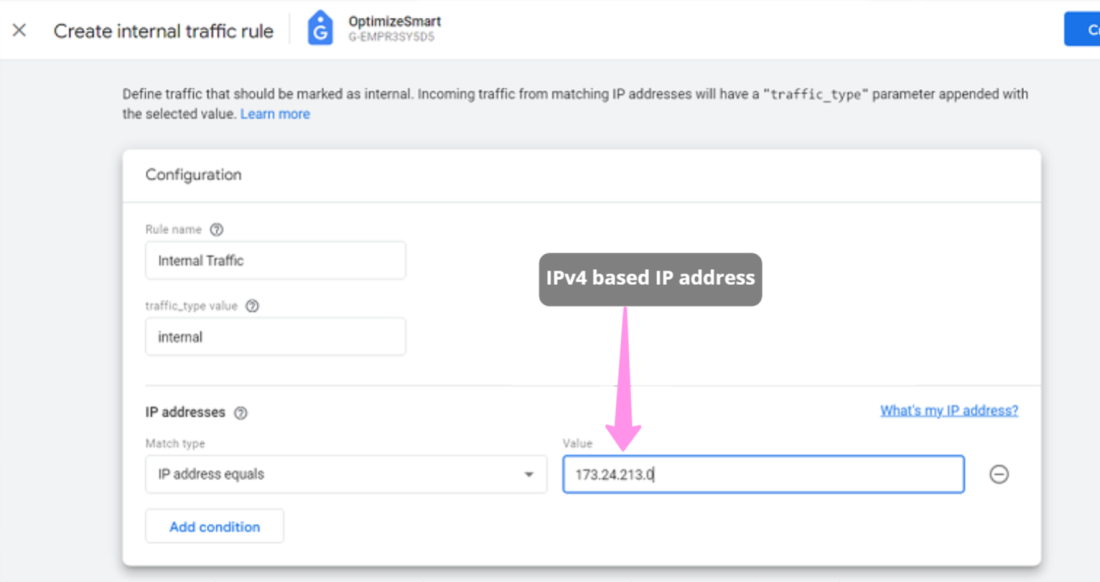
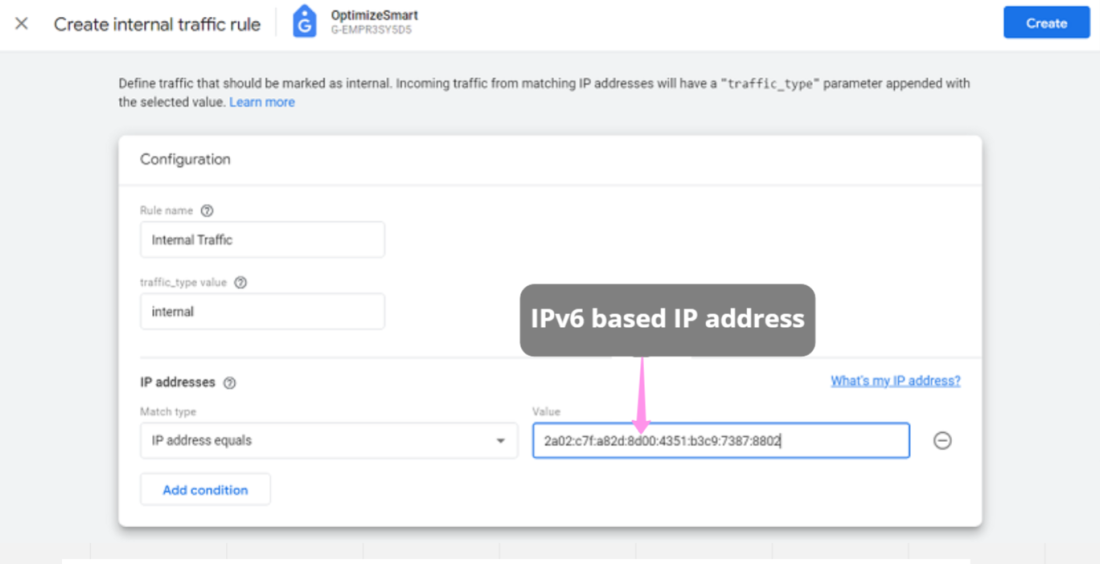
Note 1: In GA4, you can enter IPv4 or IPv6 addresses in the IP address field.
Here is an example of an IPv4 based IP address:
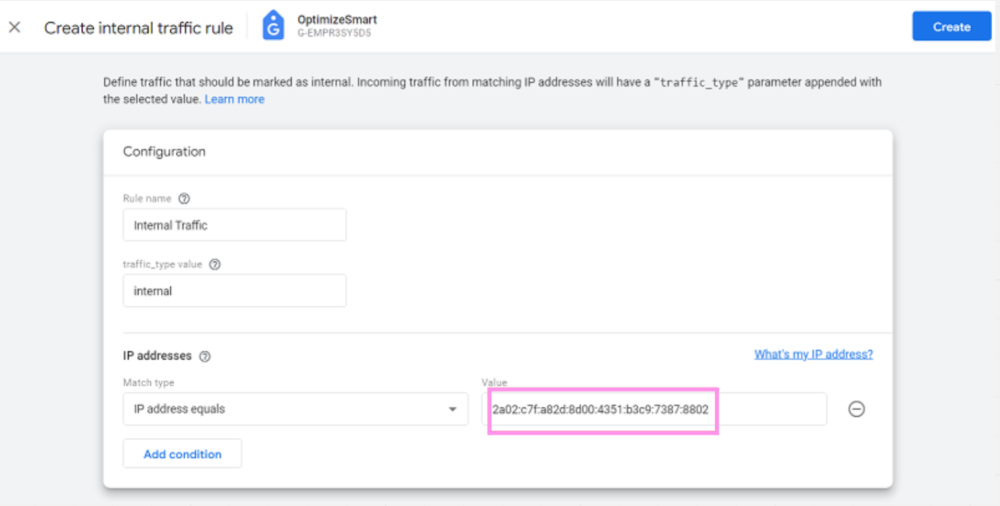
Here is an example of an IPv6-based IP address:
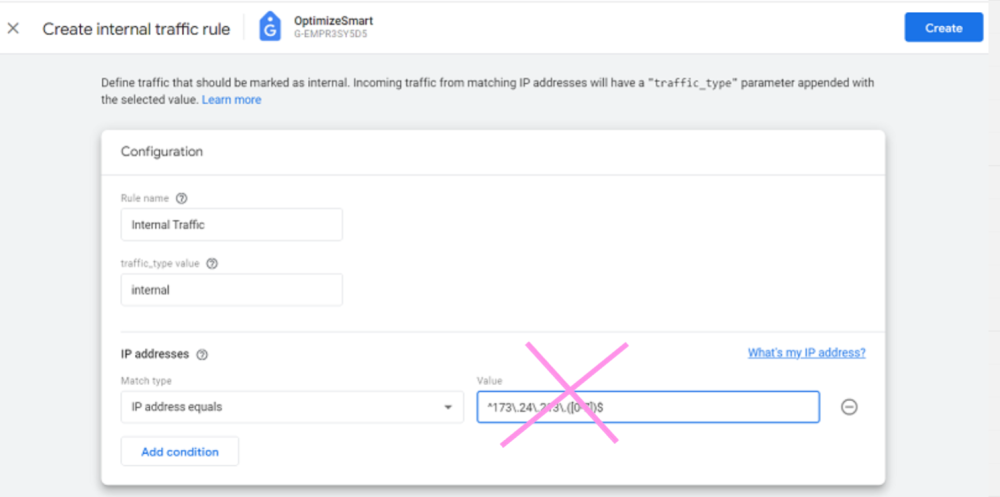
Note 2: The IP address field in GA4 does not allow the use of regular expressions.
Note 3: If you want to set multiple conditions to identify internal IP addresses, click on the ‘Add Condition’ button.
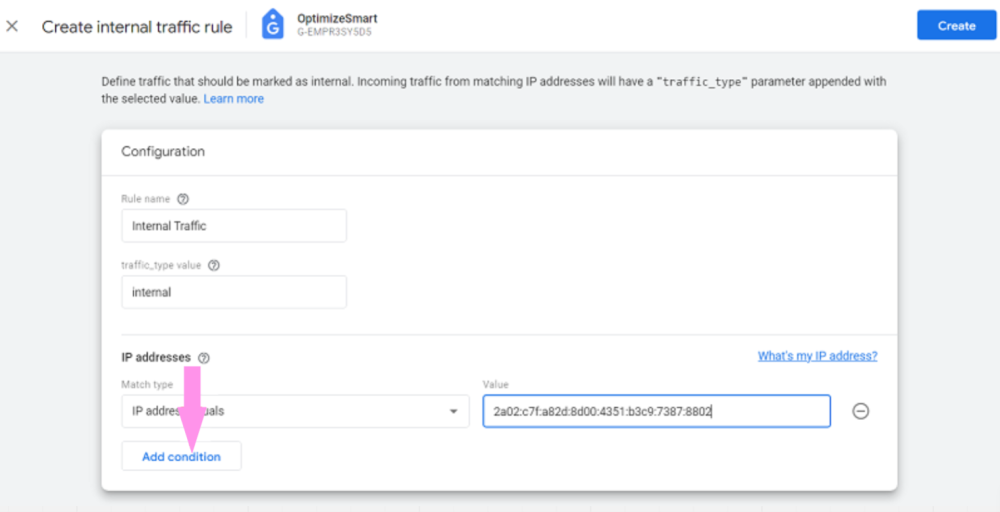
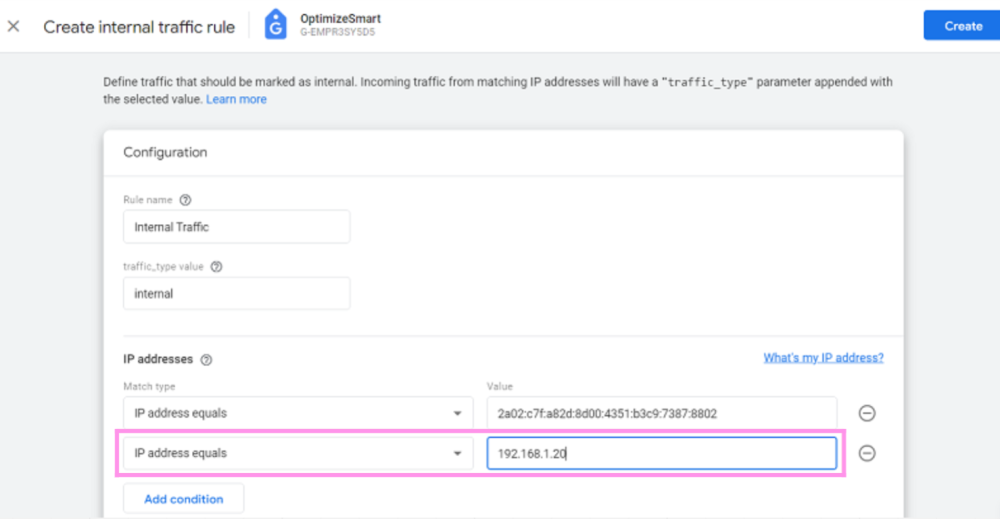
When you set multiple conditions to identify internal IP addresses, they are connected by logical OR.
For instance, IP addresses that match ‘2a02:c7fa82d:8d00:4351:b3c9:7387:8802’ or ‘192.168.1.20’ will be flagged as internal traffic.
Step #12: Now input the IP address for which you want to exclude internal traffic.
If you want to exclude all traffic originating from your device but do not know your IP address, click on the link ‘What’s my IP address’.
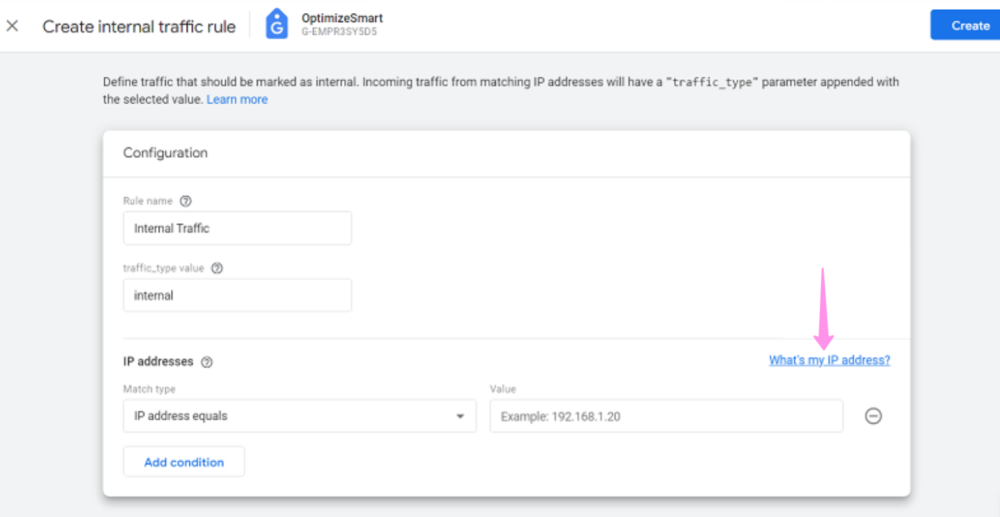
You will be automatically redirected to a new tab in your browser window, where you can view your IP address.
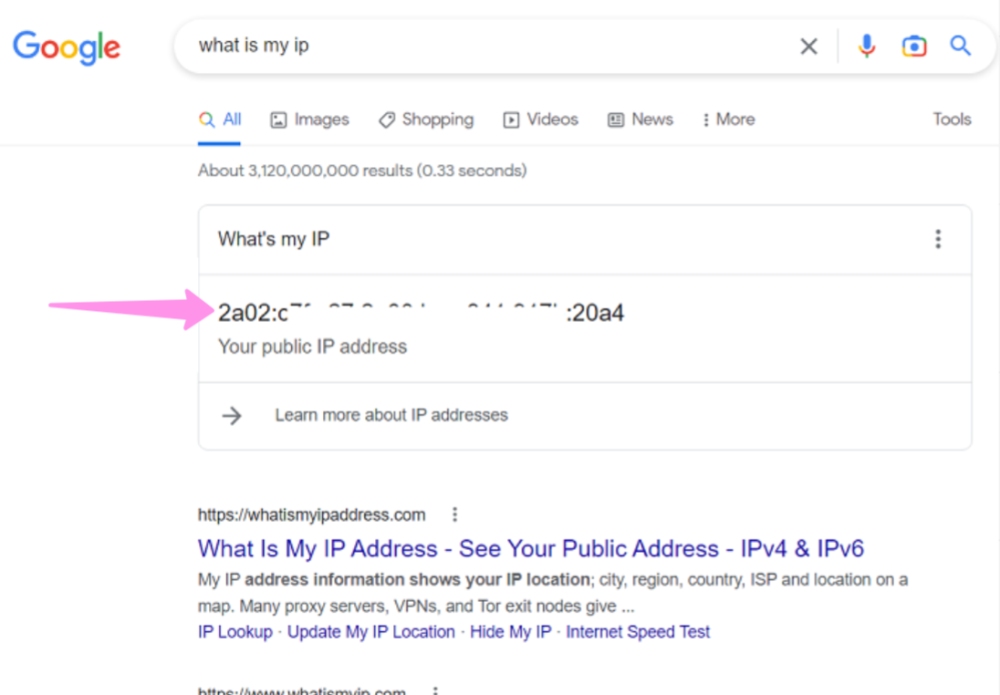
Step #13: Copy your IP address and paste it into the text box below ‘IP address:
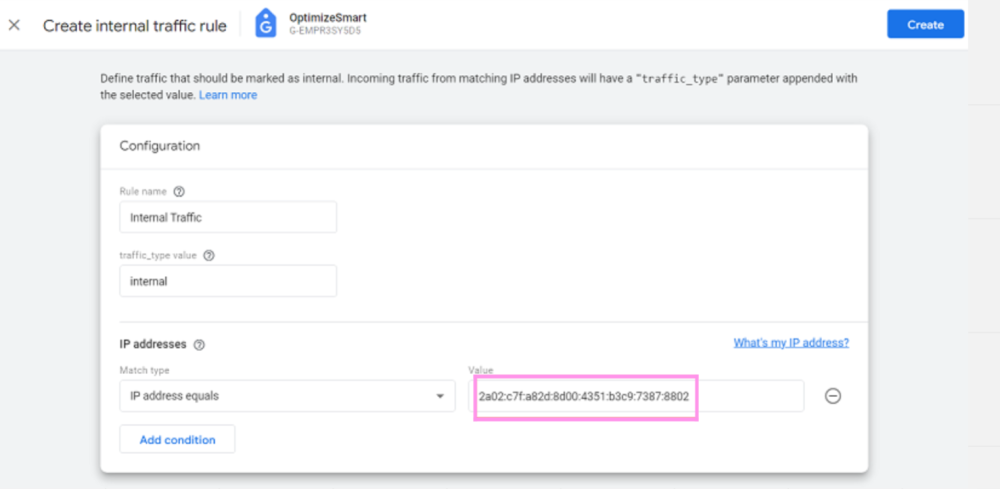
Step #14: To create your internal traffic data filter, click on the ‘Create’ button.
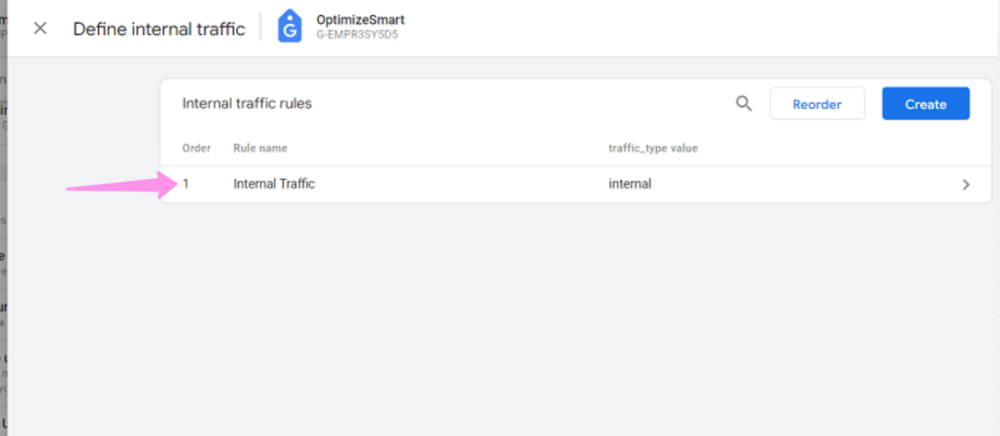
Your new internal traffic rule will appear similar to the one below.
Step #15: Click on the cross button (at the top left of your screen) three times to go back to the admin section of your GA4 property. You should now see a screen similar to the one below:
How can the ‘Exclude Internal Traffic’ data filter in GA4 be tested?
To do it, you need to follow the steps below:
Step #1: If you are blocking traffic from your own device, simply access your website using a different device.
If you are blocking traffic from an external IP address that doesn’t belong to your device, you can ask the person who owns that IP address to visit your website, provided you have added their IP address to the exclude internal filter.
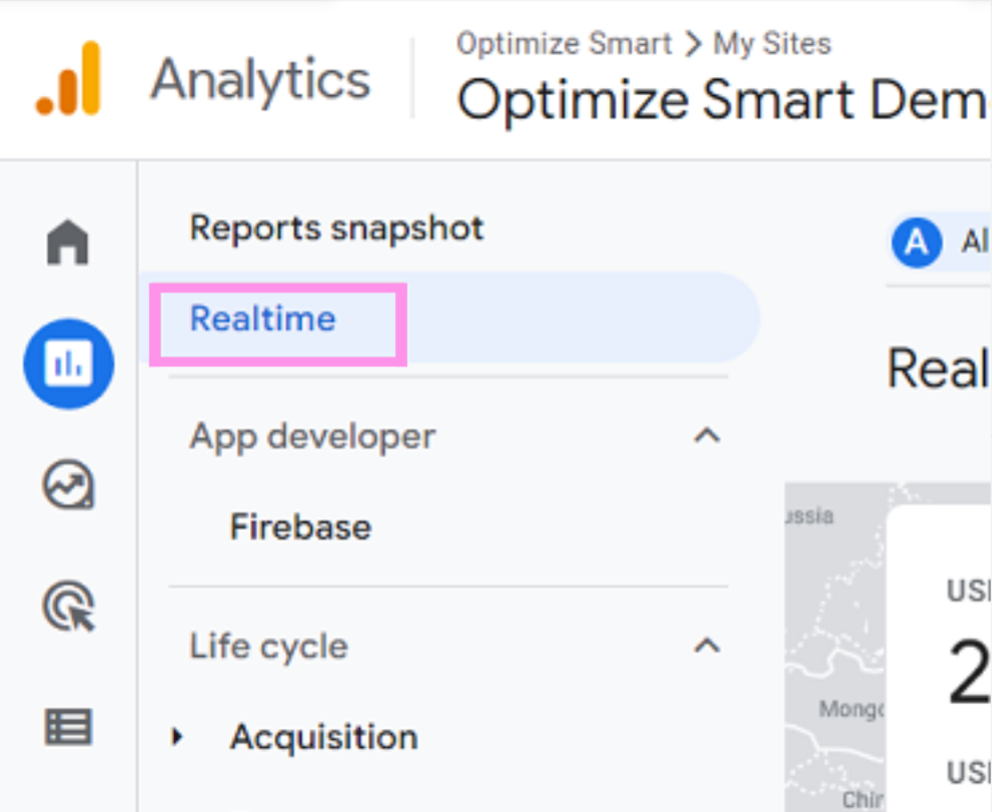
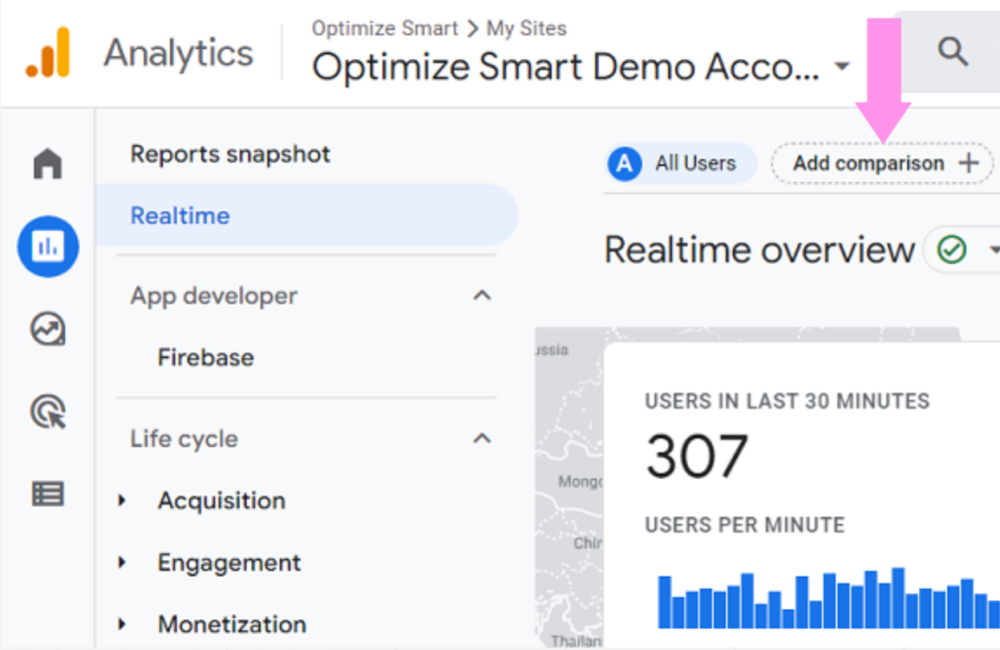
Step #2: Access the ‘Realtime’ report in your GA4 property.
Step #3: Find the ‘Add Comparison’ button and click it.
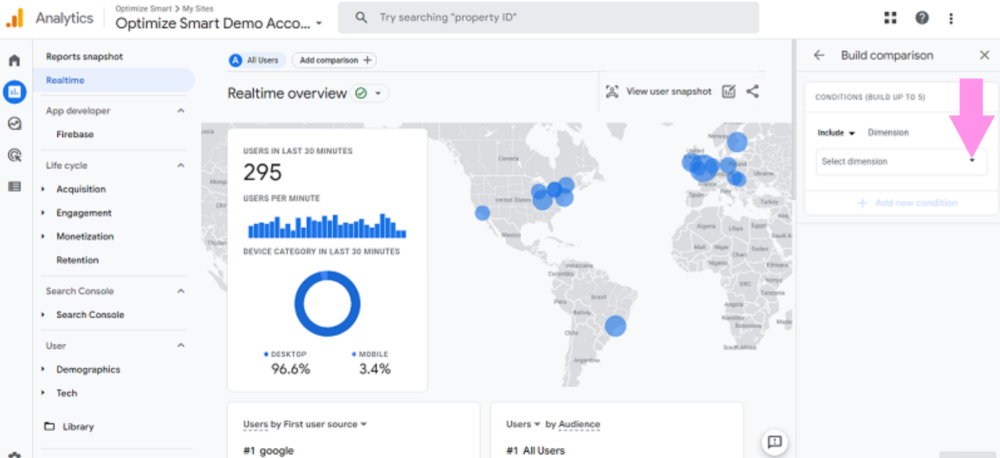
Step #4: Now, click on the drop-down menu located under the ‘Dimension’ label.
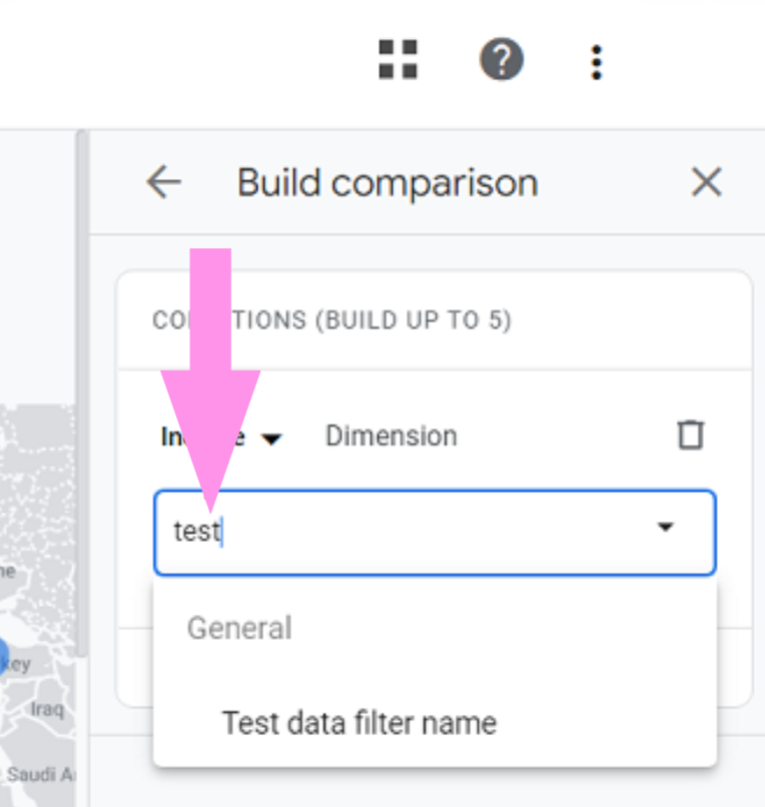
Step #5: Enter the term ‘Test’ and you will be able to view the dimension labelled ‘Test data filter name’ in the drop-down list.
Note: if the ‘Test data filter name’ dimension appears disabled, you might need to wait for 12-24 hours.
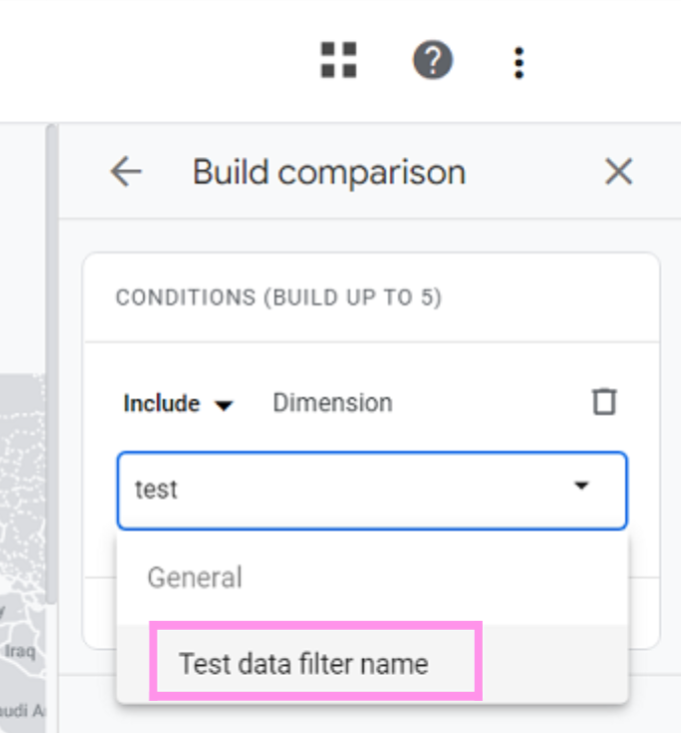
Step #6: Select the ‘Test data filter name’ dimension by clicking on its name.
Step #7: First, click on the drop-down located under ‘Dimension Values’, and then, select the checkbox next to ‘Internal Traffic’.
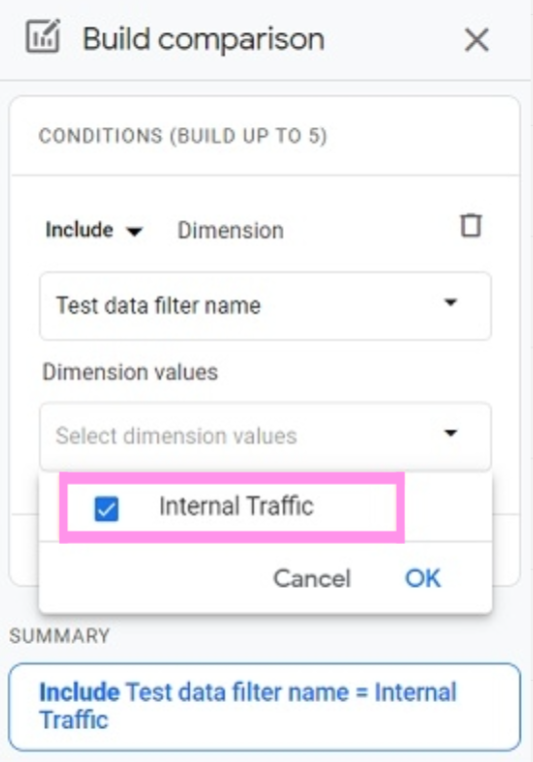
Step #8: Click on the ‘OK’ button to confirm the selection.
Step #9: Click on the ‘Apply’ button to save the changes.
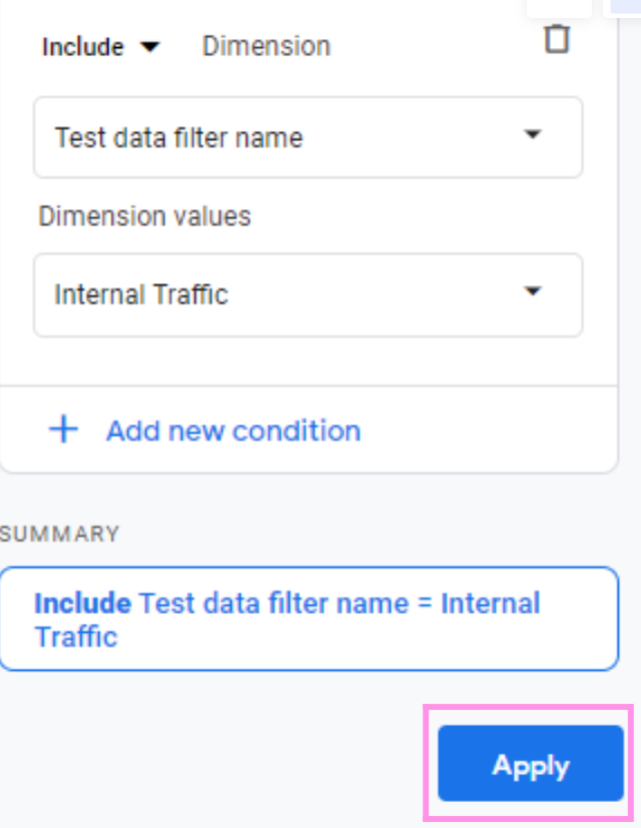
After completing the previous steps, you should be able to see the new comparison applied to your report.
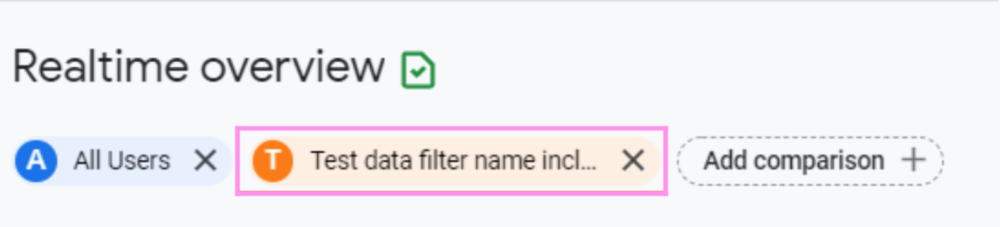
Step #10: Reload your browser window.
You should now be able to view the filtered data under ‘Test data filter name’.
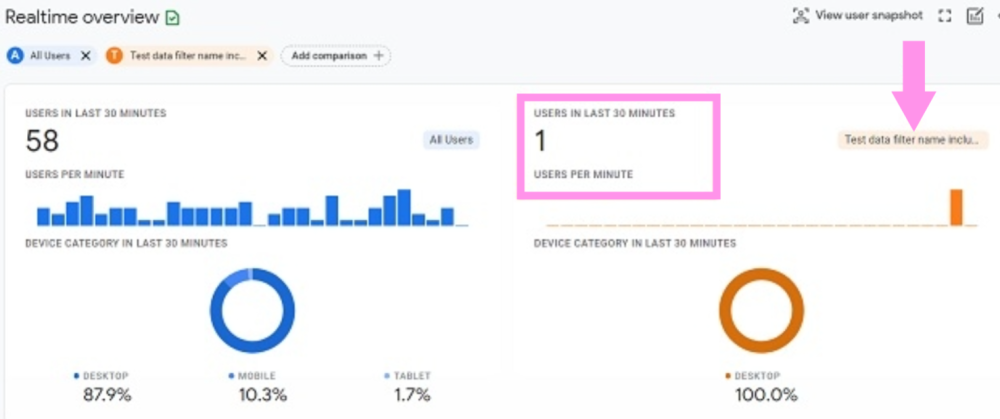
The real-time view displayed in the orange column allows us to see the traffic originating from the internal IP address we had defined earlier.
This indicates that our filter is working properly, and we can now activate it to exclude internal traffic from our reports.
What are the steps to activate the ‘Exclude Internal Traffic’ data filter in Google Analytics 4?
Step #1: First, navigate to your property, and then click on the ‘Admin’ link.
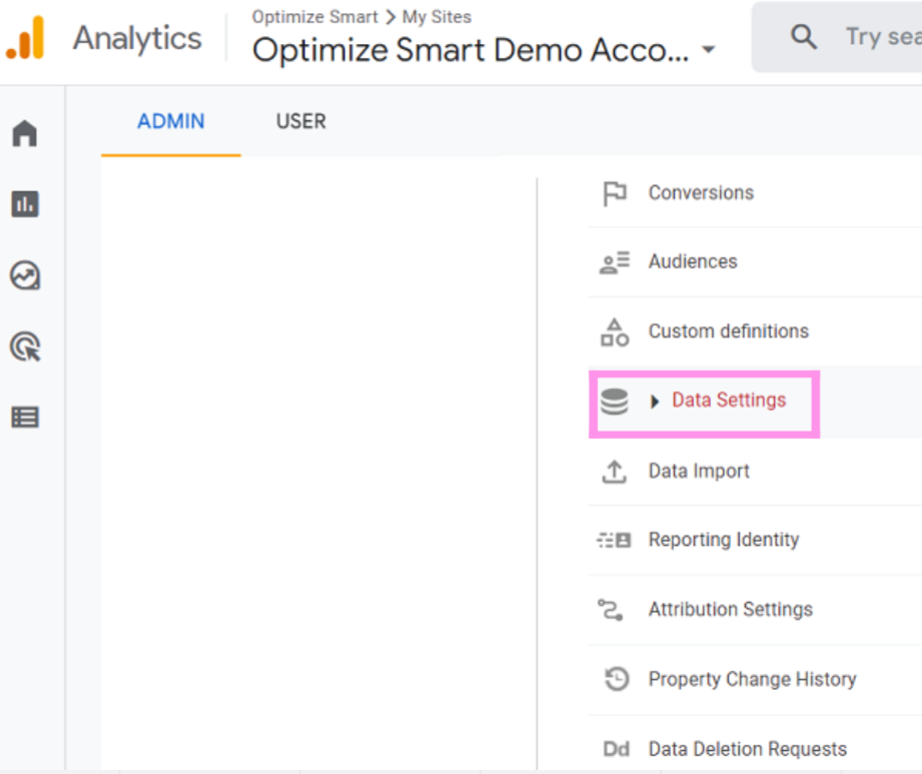
Step #2: To access the ‘Data Settings’ menu, simply click on the corresponding drop-down menu.
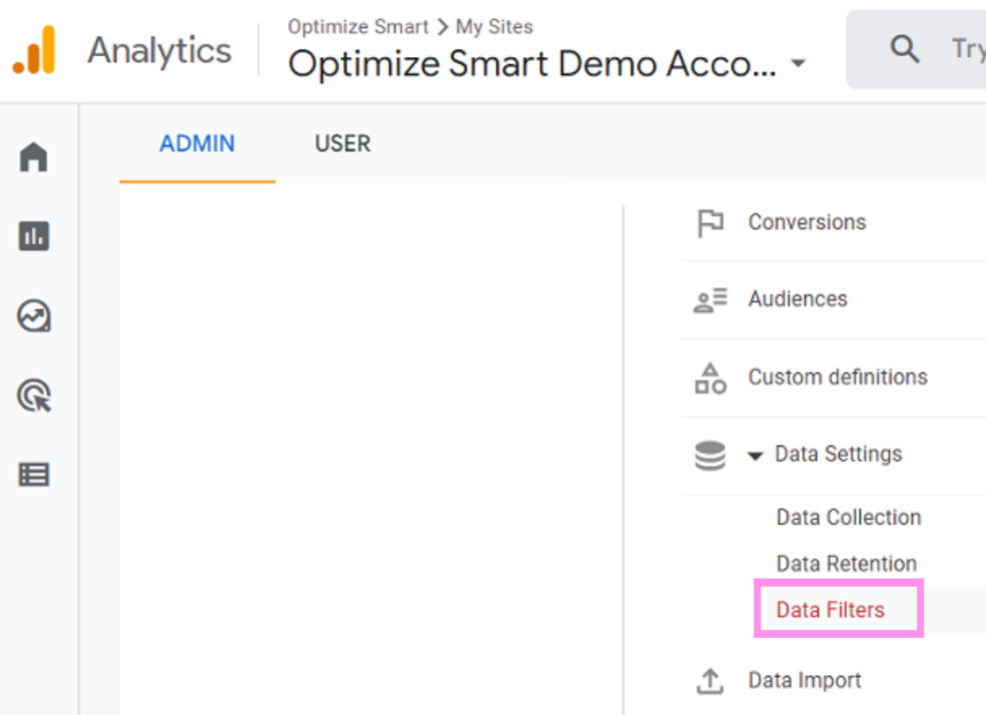
Step #3: Now click on the ‘Data Filters’ button.
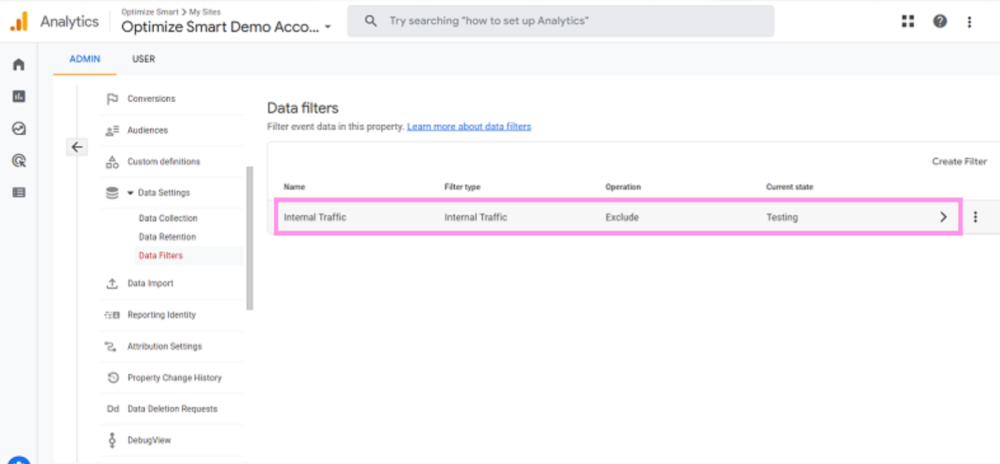
Step #4: In this step, you need to click on the ‘Internal Traffic’ data filter.
Step #5: Scroll down to the ‘Filter state’ section and click on ‘Active’. Then, click on the ‘Save’ button located at the top right-hand corner of your screen to apply the changes.
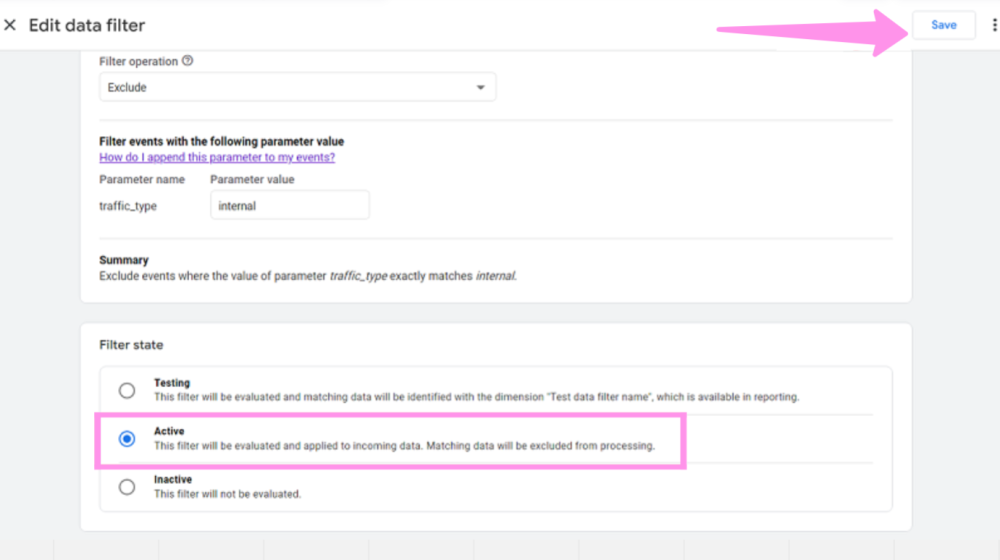
Step #6: Activate the filter by clicking on the corresponding button.
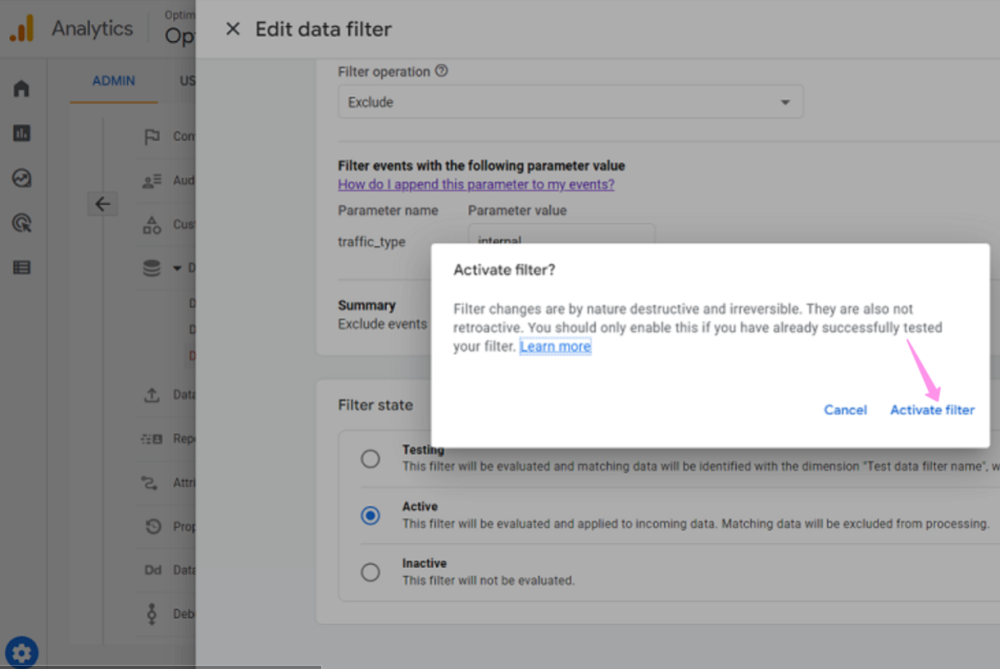
The “exclude internal traffic” filter should now be displayed as “Active.”
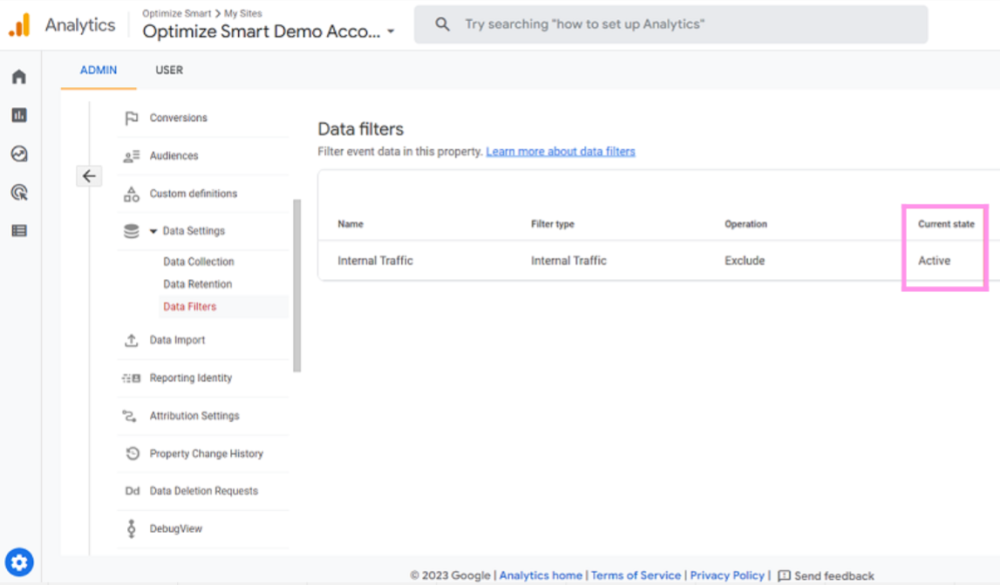
Great job! You’ve successfully configured your filter in GA4 to exclude internal traffic.
What is the process for disabling the ‘Exclude Internal Traffic’ filter for data in GA4?
To turn off the exclude internal traffic filter for your GA4 data, follow these steps:
Step #1: Go to the “admin” section of your GA4 property.
Step #2: Select the ‘Data Settings’ drop-down menu located under the Property column.
Step #3: Click on ‘Data Filters’ to access the relevant section.
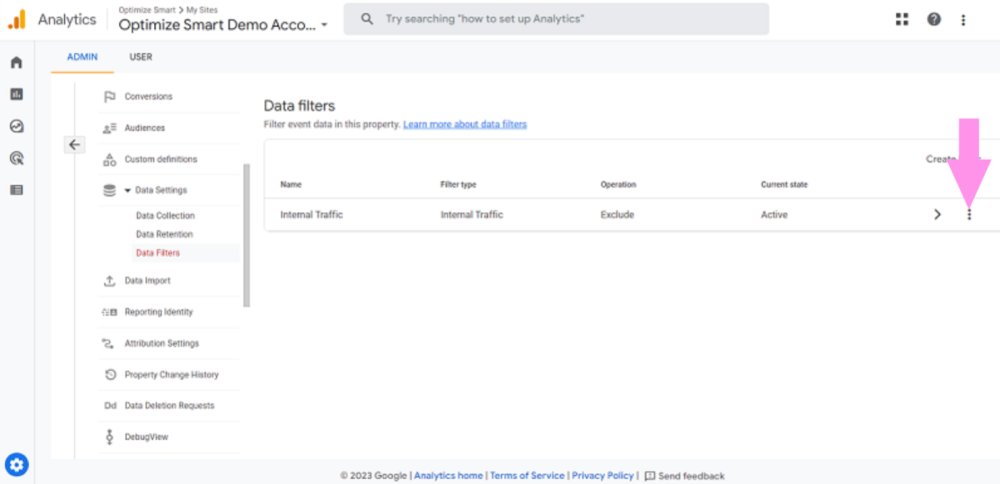
Step #4: To deactivate a data filter in GA4, locate the filter you want to disable and click on the three dots menu next to it.
Step #5: Once you have located the data filter you wish to disable, click on the ‘Deactivate filter’ option.

After deactivating the filter, you should see that the ‘Current Status’ of the filter has been updated to ‘Inactive.’
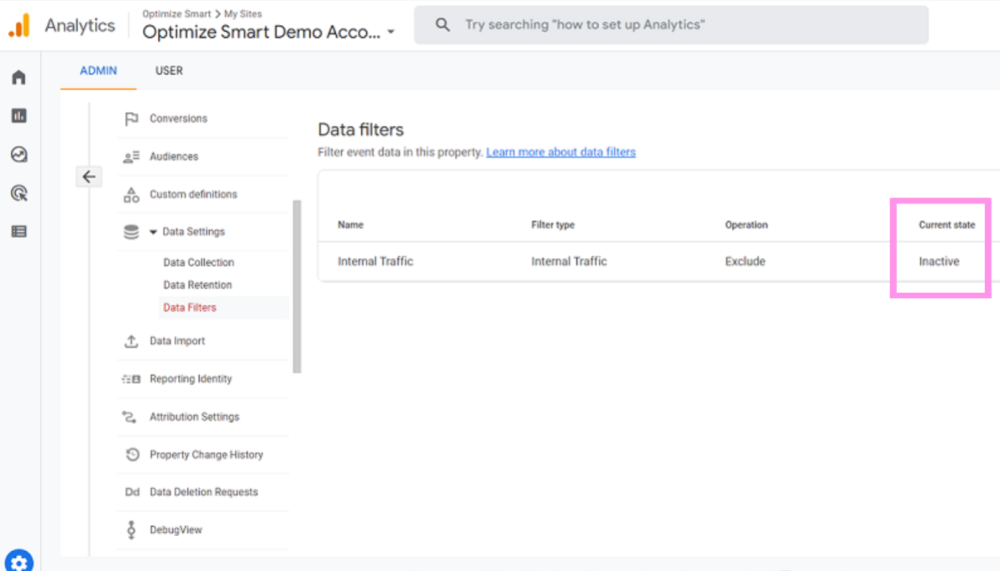
What are the steps for reactivating the ‘Exclude Internal Traffic’ data filter in GA4?
Step #1: Go to the ‘admin’ section of your GA4 property.
Step #2: Once you’ve accessed the admin area, select the ‘Data Settings’ dropdown menu located under the ‘Property’ column.
Step #3: From there, click on ‘Data Filters’ to access the filters section.
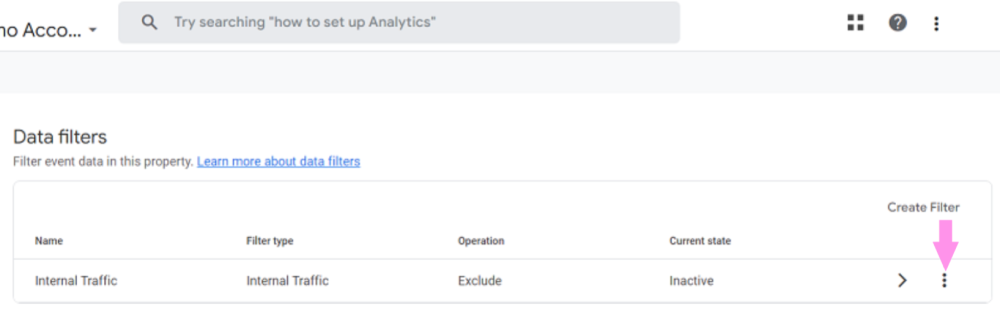
Step #4: Locate the data filter you wish to reactivate and click on the three dots menu next to it.
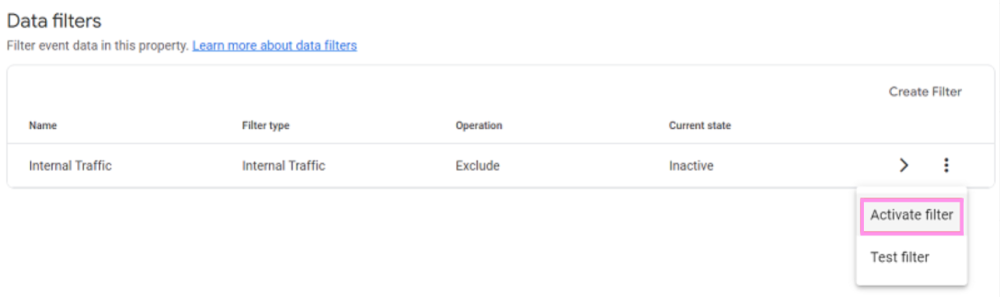
Step #5: After selecting the desired data filter, click on ‘Activate filter’ to reactivate it.
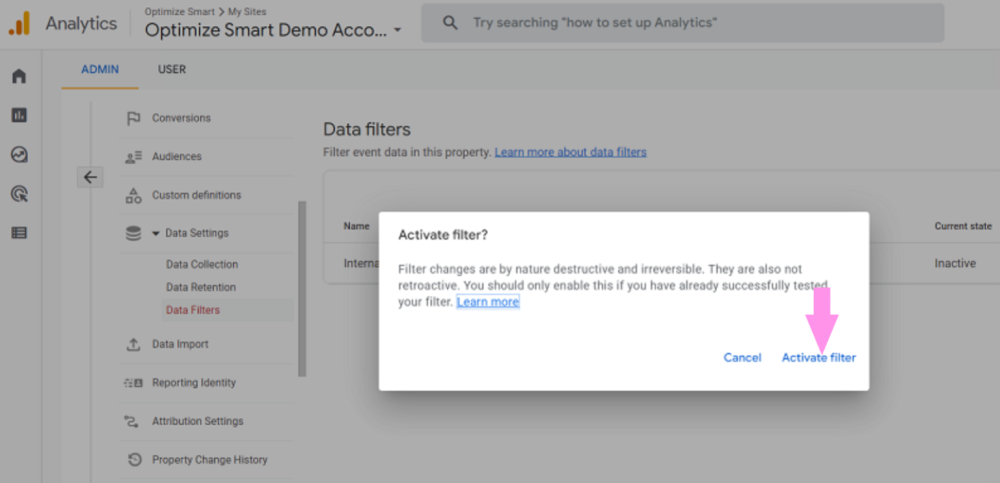
Step #6: Finally, to confirm the reactivation of the filter, click on the ‘Activate filter’ button.
How can I edit the parameters of an ‘Exclude Internal Traffic’ filter in GA4?
Step #1: Go to the ‘admin’ section of your GA4 property.
Step #2: Next, select the ‘Data Settings’ dropdown menu located under the ‘Property’ column.
Step #3: From the dropdown options, choose ‘Data Filters’ to navigate to the filters section.
Step #4: Locate and select the data filter that you wish to edit.
Step #5: Once you have selected the filter you want to edit, make the necessary changes and then click on the ‘Save’ button to confirm the modifications.
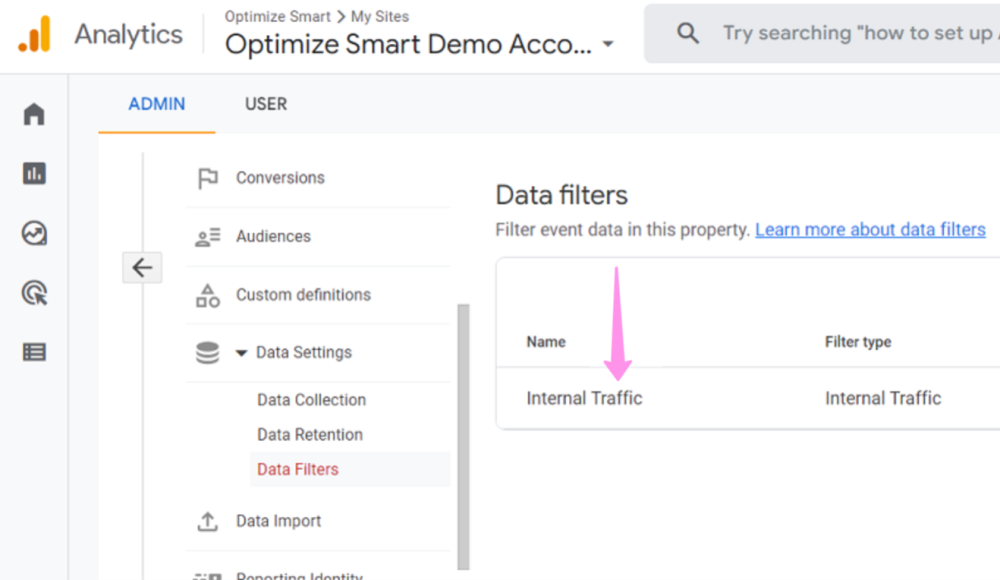
What is the process for eliminating an ‘Exclude Internal Traffic’ data filter in GA4?
Step #1: Go to the ‘admin’ section of your GA4 property.
Step #2: Now, select the ‘Data Settings’ dropdown menu located under the ‘Property’ column.
Step #3: From the dropdown options, choose ‘Data Filters’ to navigate to the filters section.
Step #4: Select the specific data filter that you wish to delete.

Step #5: Click on the three dots menu located at the top right-hand corner of your screen.
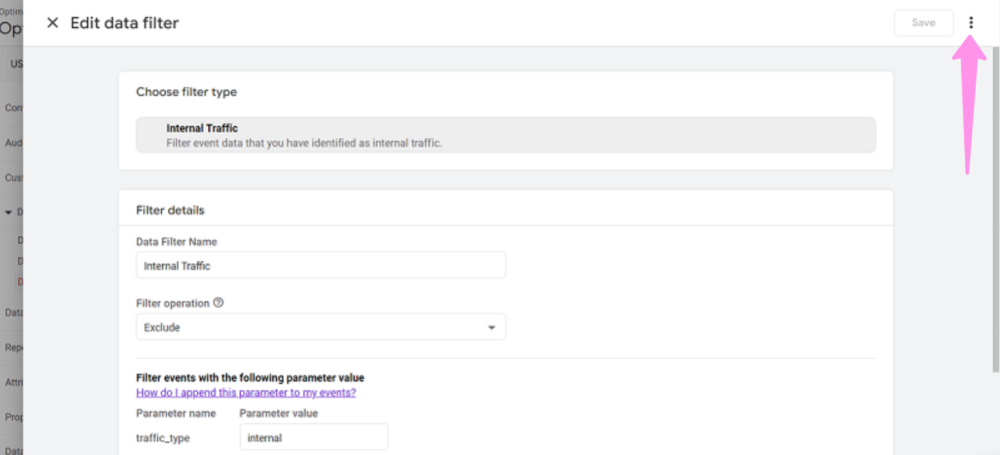
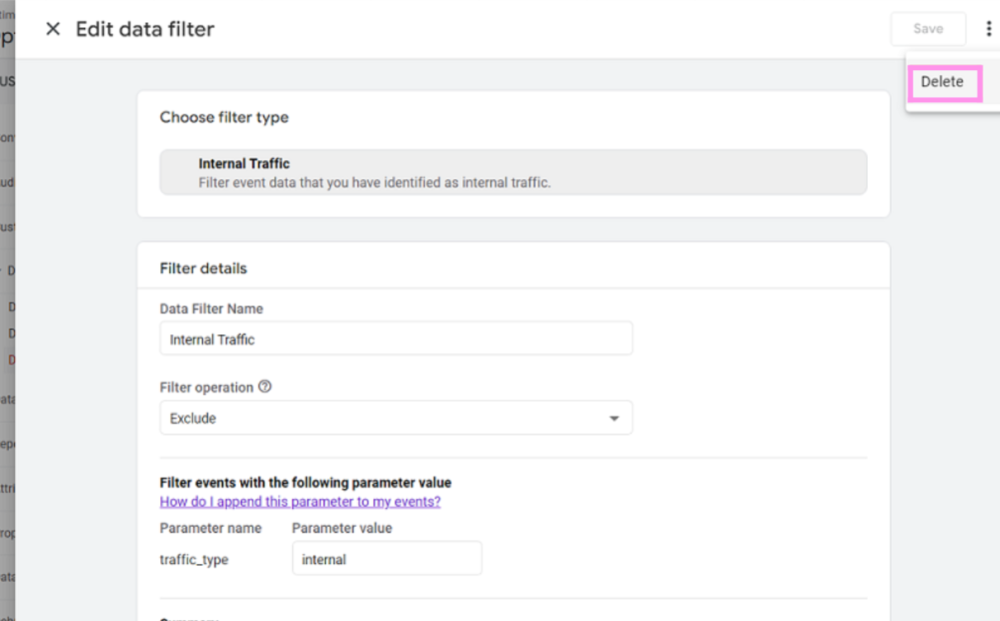
Step #6: From the dropdown menu, choose the option to ‘Delete’ the selected data filter.
Was this article helpful?
Support us to keep up the good work and to provide you even better content. Your donations will be used to help students get access to quality content for free and pay our contributors’ salaries, who work hard to create this website content! Thank you for all your support!
Reaction to comment: Cancel reply